Yosemite Valley draws in over 4 million visitors every year. Most folks show up hoping to capture those classic, jaw-dropping images you see everywhere.
After wandering through pretty much every nook of this stunning place—sometimes at ridiculous hours—I’ve figured out exactly where and how you can snap photos that actually stand out.
The five spots I’m about to share offer up the most dramatic, instantly recognizable views in Yosemite Valley. Think massive granite cliffs, waterfalls crashing down, and meadows so pristine they look unreal.
Each location asks for a slightly different approach. I’ll walk you through my favorite techniques, the little hurdles I hit, and how I managed to get the shot.
Whether you’re carrying a pro camera or just your phone, these spots will get you those iconic Yosemite photos you want.
I’ll let you in on the best times to go, camera settings that actually work, and those tiny details that can take your pictures from “pretty good” to “wow, did you really take that?”
Choosing the Most Iconic Photo Spots in Yosemite Valley
After more than a decade of shooting in Yosemite, I’ve realized the most iconic spots mix legendary landmarks with just the right conditions for photos.
The best places let you play with different compositions and stay accessible year-round, which is pretty important.
How I Define an Iconic Yosemite Photo Spot
To me, a true Yosemite photo spot has to feature the valley’s most recognizable landmarks. I’m always looking for ways to show off El Capitan, Half Dome, or Yosemite Falls in a fresh light.
I want people to see my photo and instantly think, “That’s Yosemite.”
It helps if the location pops up in famous photography books, too. Spots like Tunnel View and Glacier Point have been favorites for generations of photographers. That kind of history just makes them feel more special.
Here’s what makes a spot iconic in my book:
- Showcases a big-name Yosemite landmark
- Instantly recognizable, even to casual viewers
- Has a place in the history of photography
- Easy enough for most people to reach
I’m always after something unique, though. Yosemite Valley’s granite and waterfalls? You just can’t find those anywhere else.
Must-Have Views: What Makes a Spot Photogenic
The best Yosemite photo spots pack multiple visual elements into one frame. I’m always hunting for places where granite cliffs, waterfalls, and sweeping valley views come together.
What I look for:
- Foreground interest—rivers, wild meadows, or gnarly trees
- Midground stars—waterfalls or dramatic rock shapes
- Background depth—distant peaks and that big California sky
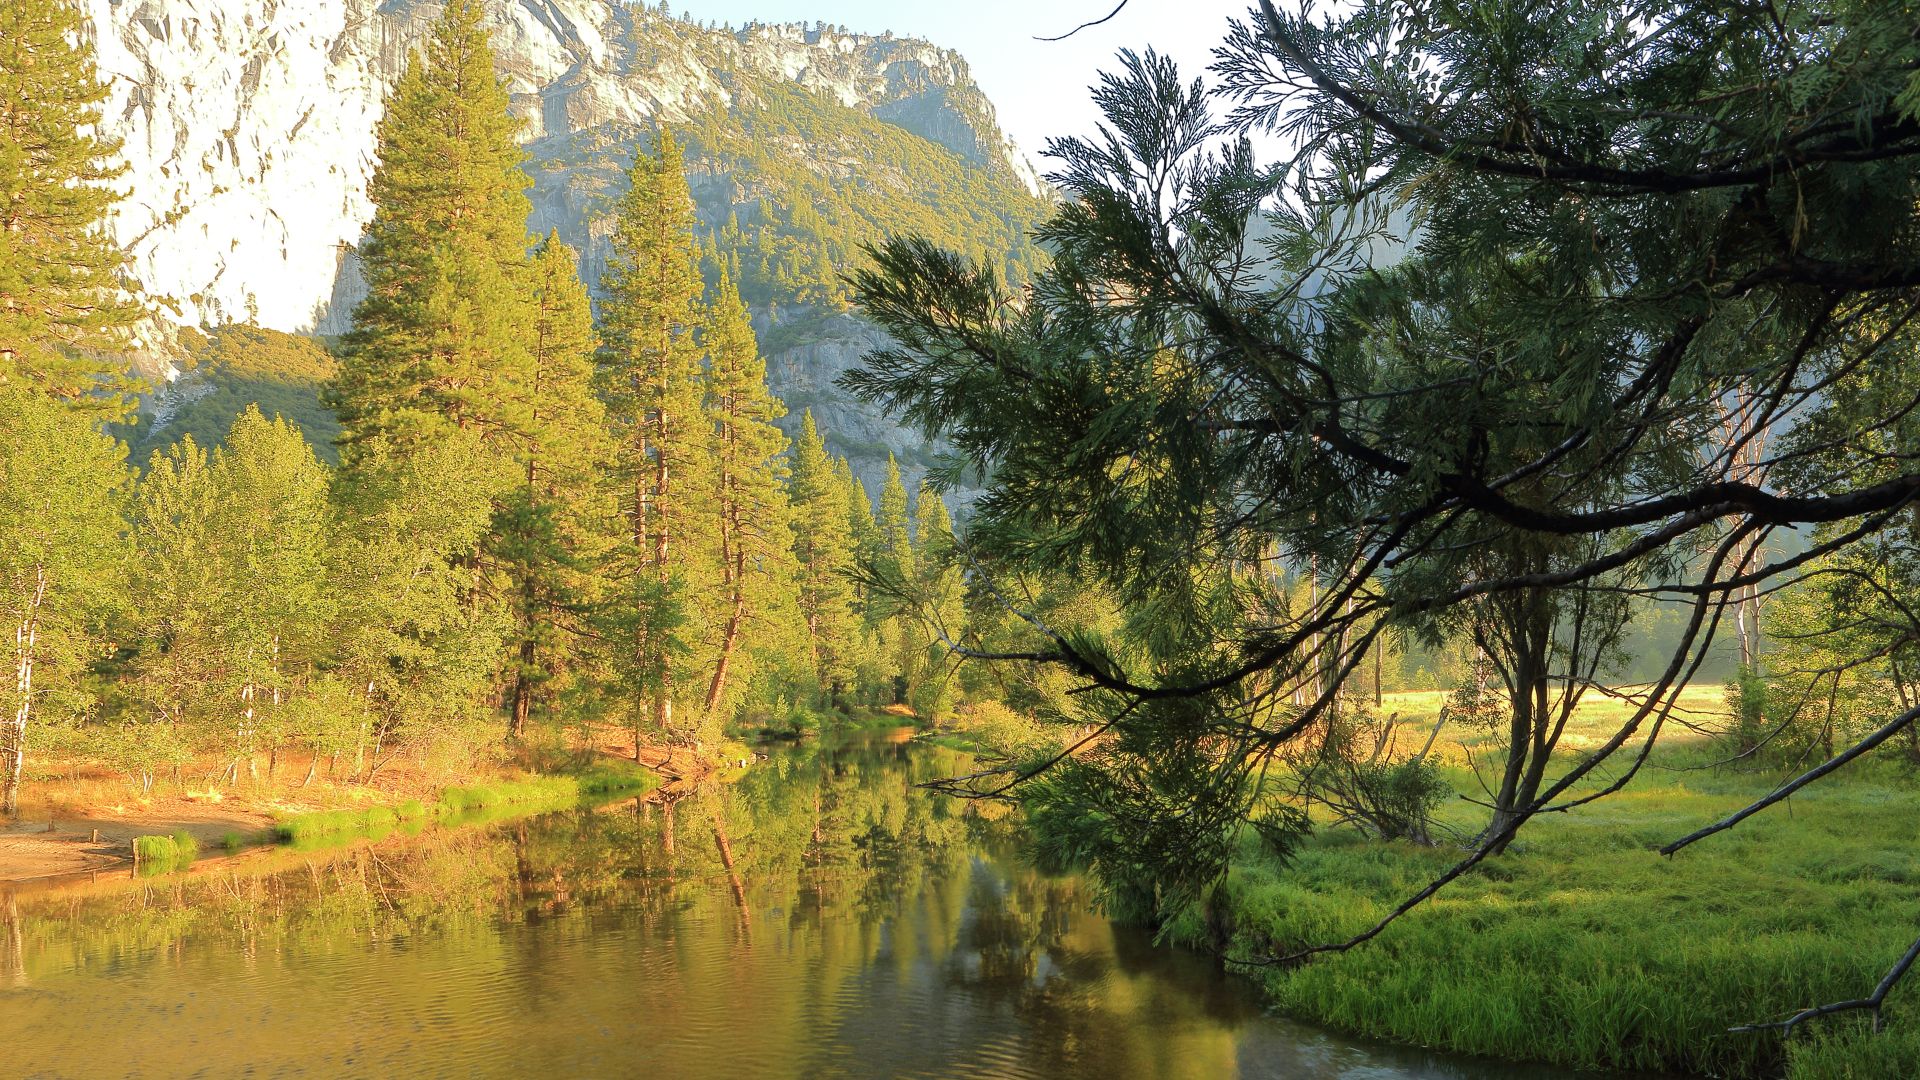
The Merced River is a go-to for foregrounds. It’s perfect for leading lines and those glassy reflections that make a photo pop.
Lighting is everything. I always chase good sunrise or sunset light. Valley View, for example, looks incredible at both golden hours.
Lighting must-haves:
- Open views of the sky
- Cool shadow play on the rocks
- Seasonal shifts in light
- Weather that keeps things interesting
And I love spots with options. The best ones let you shoot wide landscapes or zoom in for details—never gets boring.
Tips for Planning Your Yosemite Photography Trip
I always start by checking road closures. Glacier Point Road shuts down from November to May, which can throw a wrench in your plans.
Seasonal stuff to keep in mind:
- Spring: Waterfalls are wild, but some roads close
- Summer: Everything’s open, but it’s packed
- Fall: Gorgeous light, way fewer crowds
- Winter: Snowy magic, but you’ll have limited access
Popular spots like Tunnel View fill up fast. I usually show up at least 45 minutes before sunrise to snag a decent spot.
My essential planning checklist:
- Check the NPS site for updates
- Download offline maps (cell service is spotty)
- Pack a headlamp if you’re out before dawn
- Have backup parking spots in mind
Weather changes everything. I keep an eye on the forecast for fog, storms, or clear skies. Each one gives you a different shooting opportunity.
Think about your hiking comfort level, too. Some places need a bit of stamina or a head for heights.
Tunnel View: Capturing Yosemite’s Signature Vista
Tunnel View gives you that classic, panoramic shot—three icons in one frame.
If you time it right, you’ll catch Half Dome, El Capitan, and Bridalveil Fall all glowing in perfect light.
Best Times and Lighting to Photograph Tunnel View
I’ve found late afternoon into sunset is when Tunnel View truly shines.
The golden hour bathes the granite in warm, rich light and adds so much depth.
Morning vs. Evening:
- Morning: Sun’s behind everything, so you get weird flares and harsh light
- Late Afternoon: Side lighting brings out the cliff textures
- Sunset: Everything glows, especially Half Dome and El Cap
I really love shooting during blue hour. The crowds head out, the light softens, and the whole valley just feels peaceful.
If you’re lucky enough to visit in spring, Bridalveil Fall goes into overdrive. I always check the weather before I go; sometimes winter storms roll in and add dramatic clouds that make the shot.
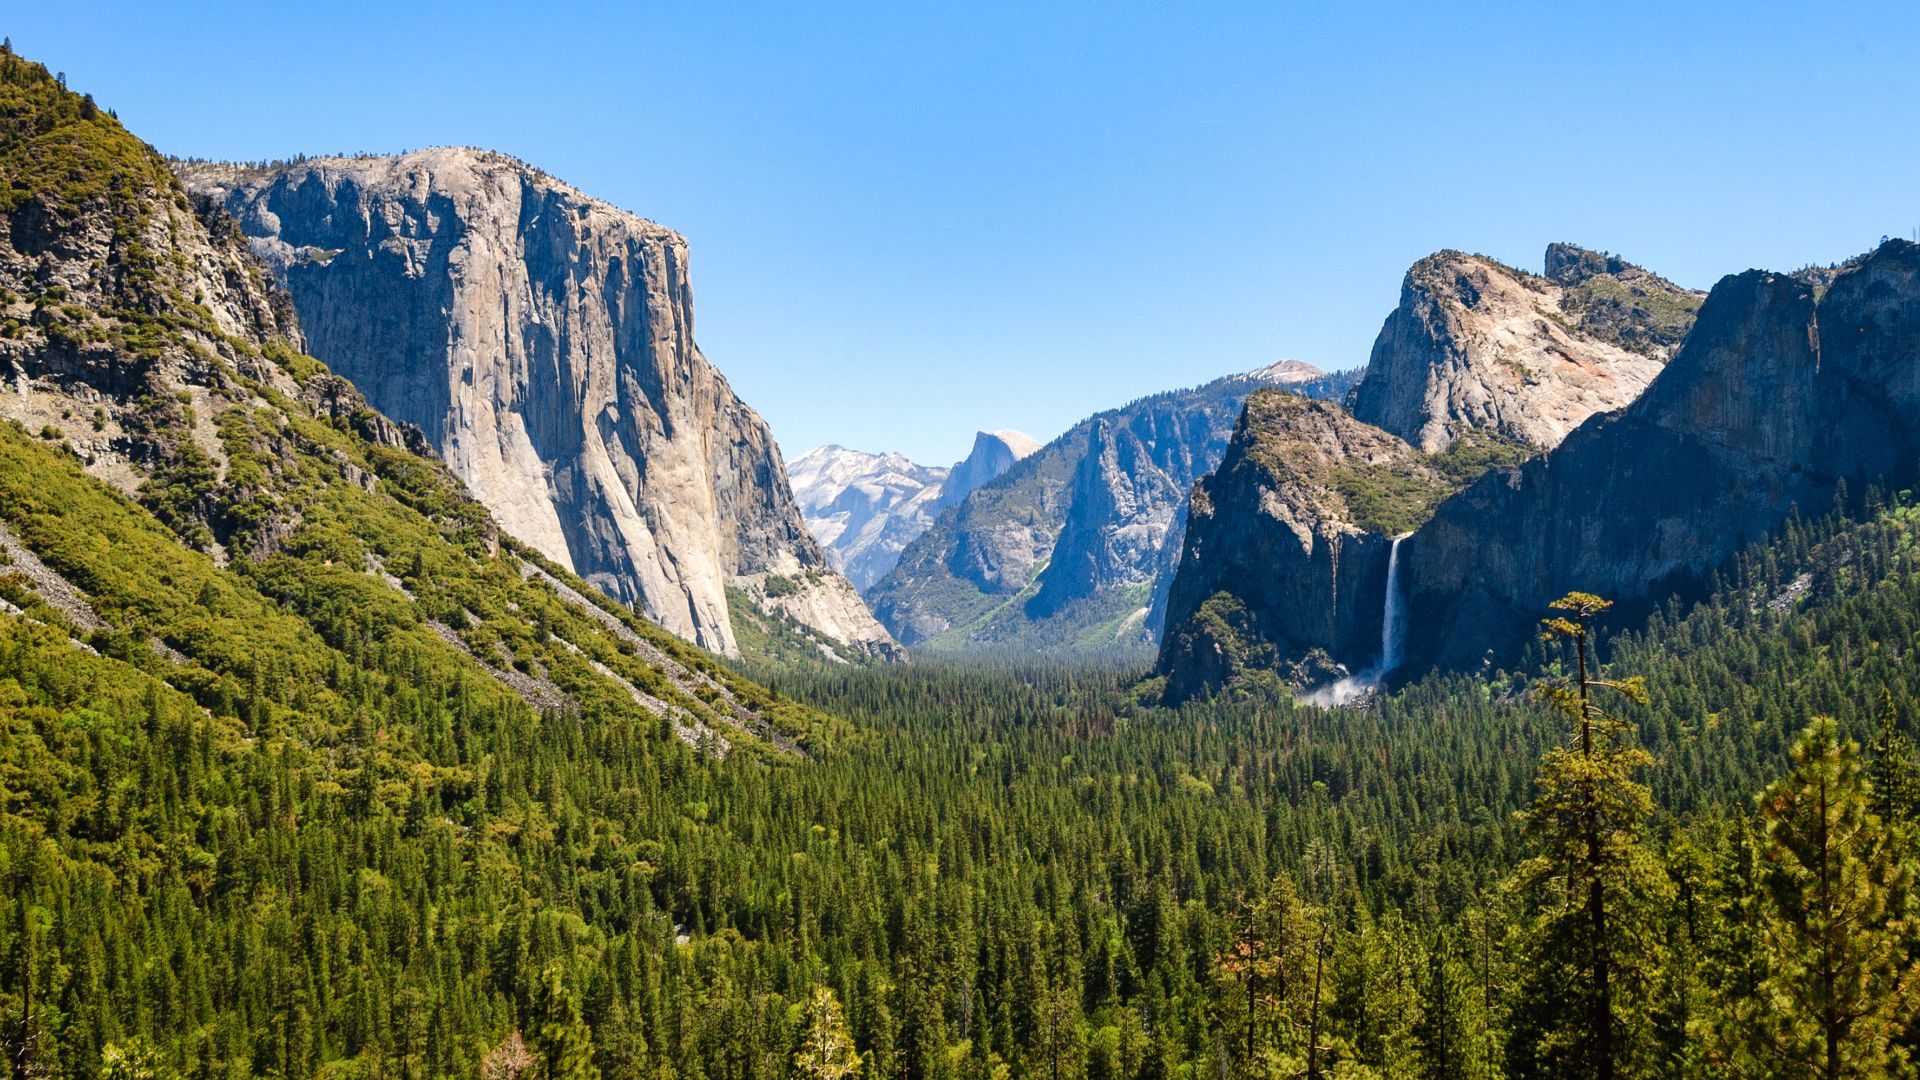
Composing the Classic Shot: Framing Half Dome, El Capitan, and Bridalveil Fall
The classic Tunnel View shot centers Half Dome, puts El Capitan on the left, and balances Bridalveil Fall on the right.
I usually set up at the main overlook for that traditional look.
Composition tips:
- Half Dome: Dead center, draws your eye
- El Capitan: Holds down the left, gives you scale
- Bridalveil Fall: Balances the right, adds motion
- Valley Floor: Foreground interest and leading lines
I use a wide-angle lens—usually 14-24mm—to get everything in. That way, all three landmarks fit without looking squished.
The rule of thirds works perfectly here. I drop the horizon to the lower third and let those granite giants fill the upper part of the frame.
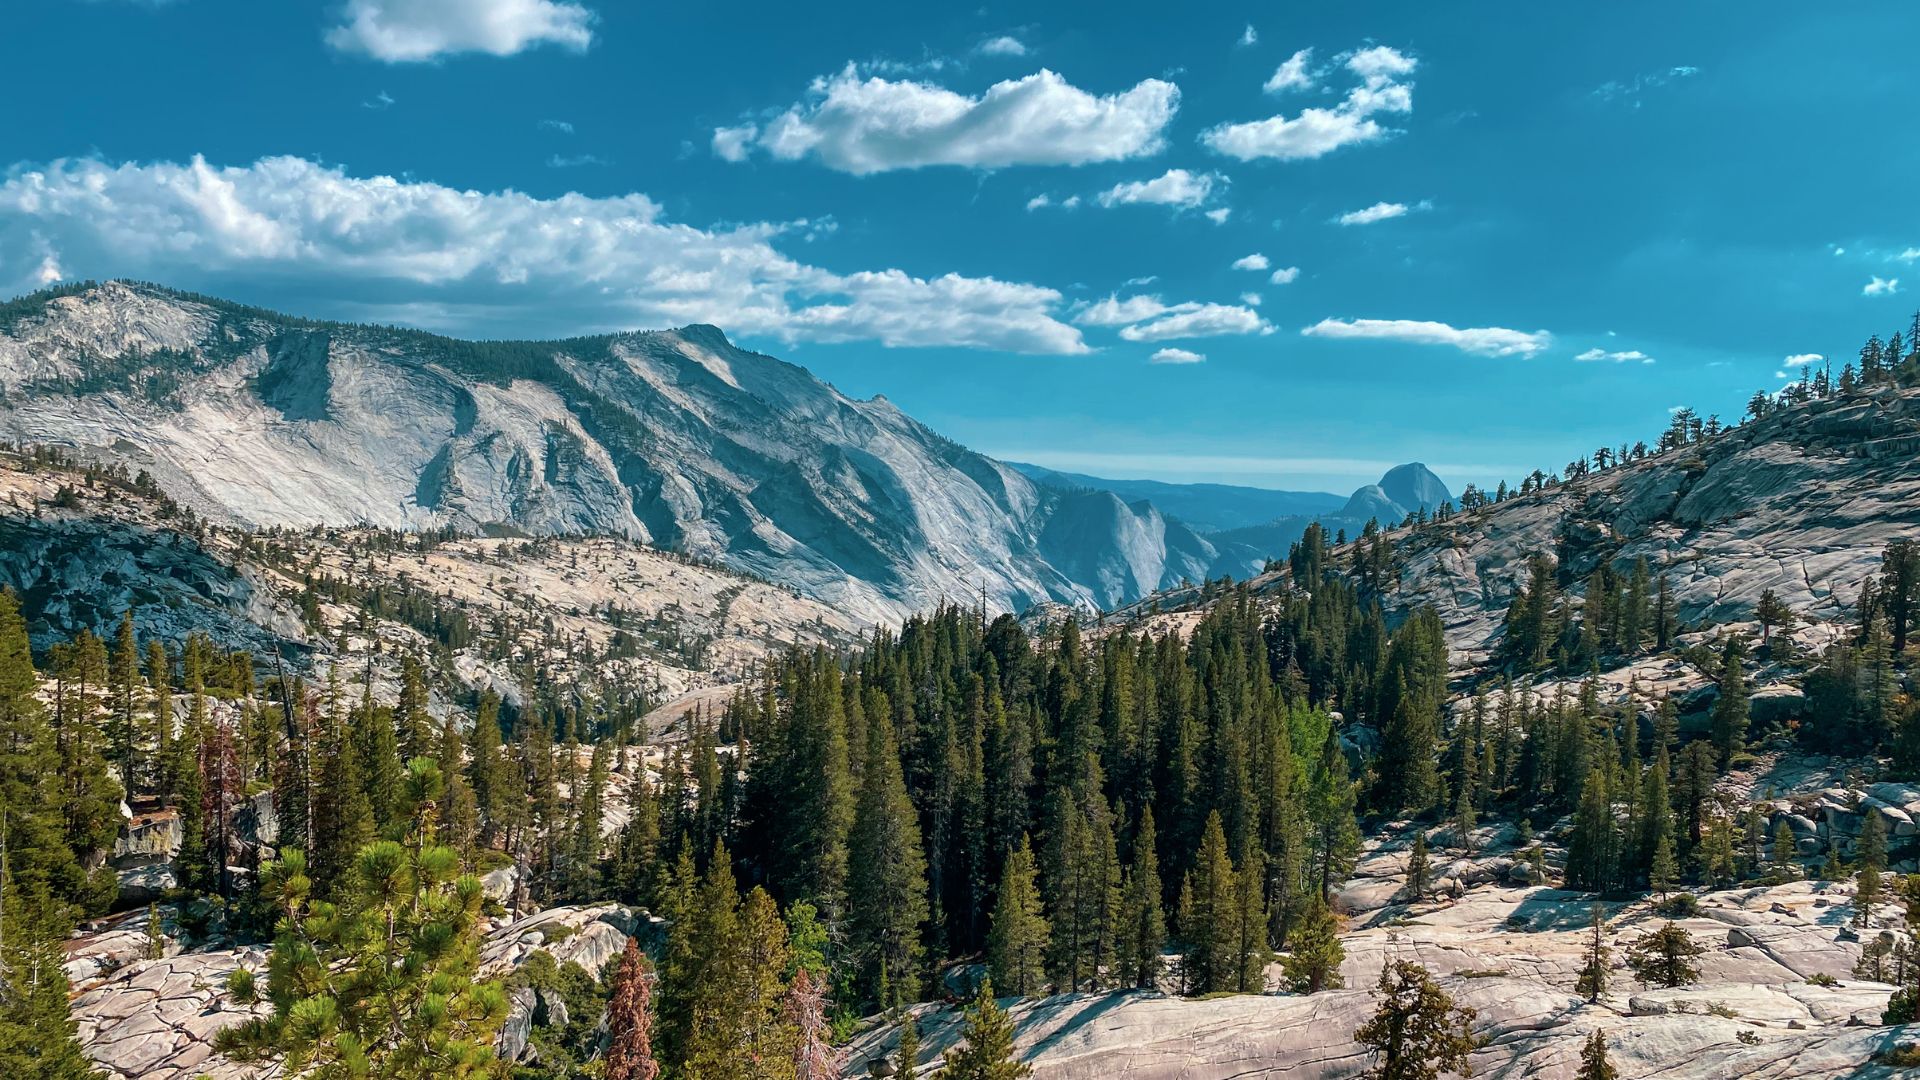
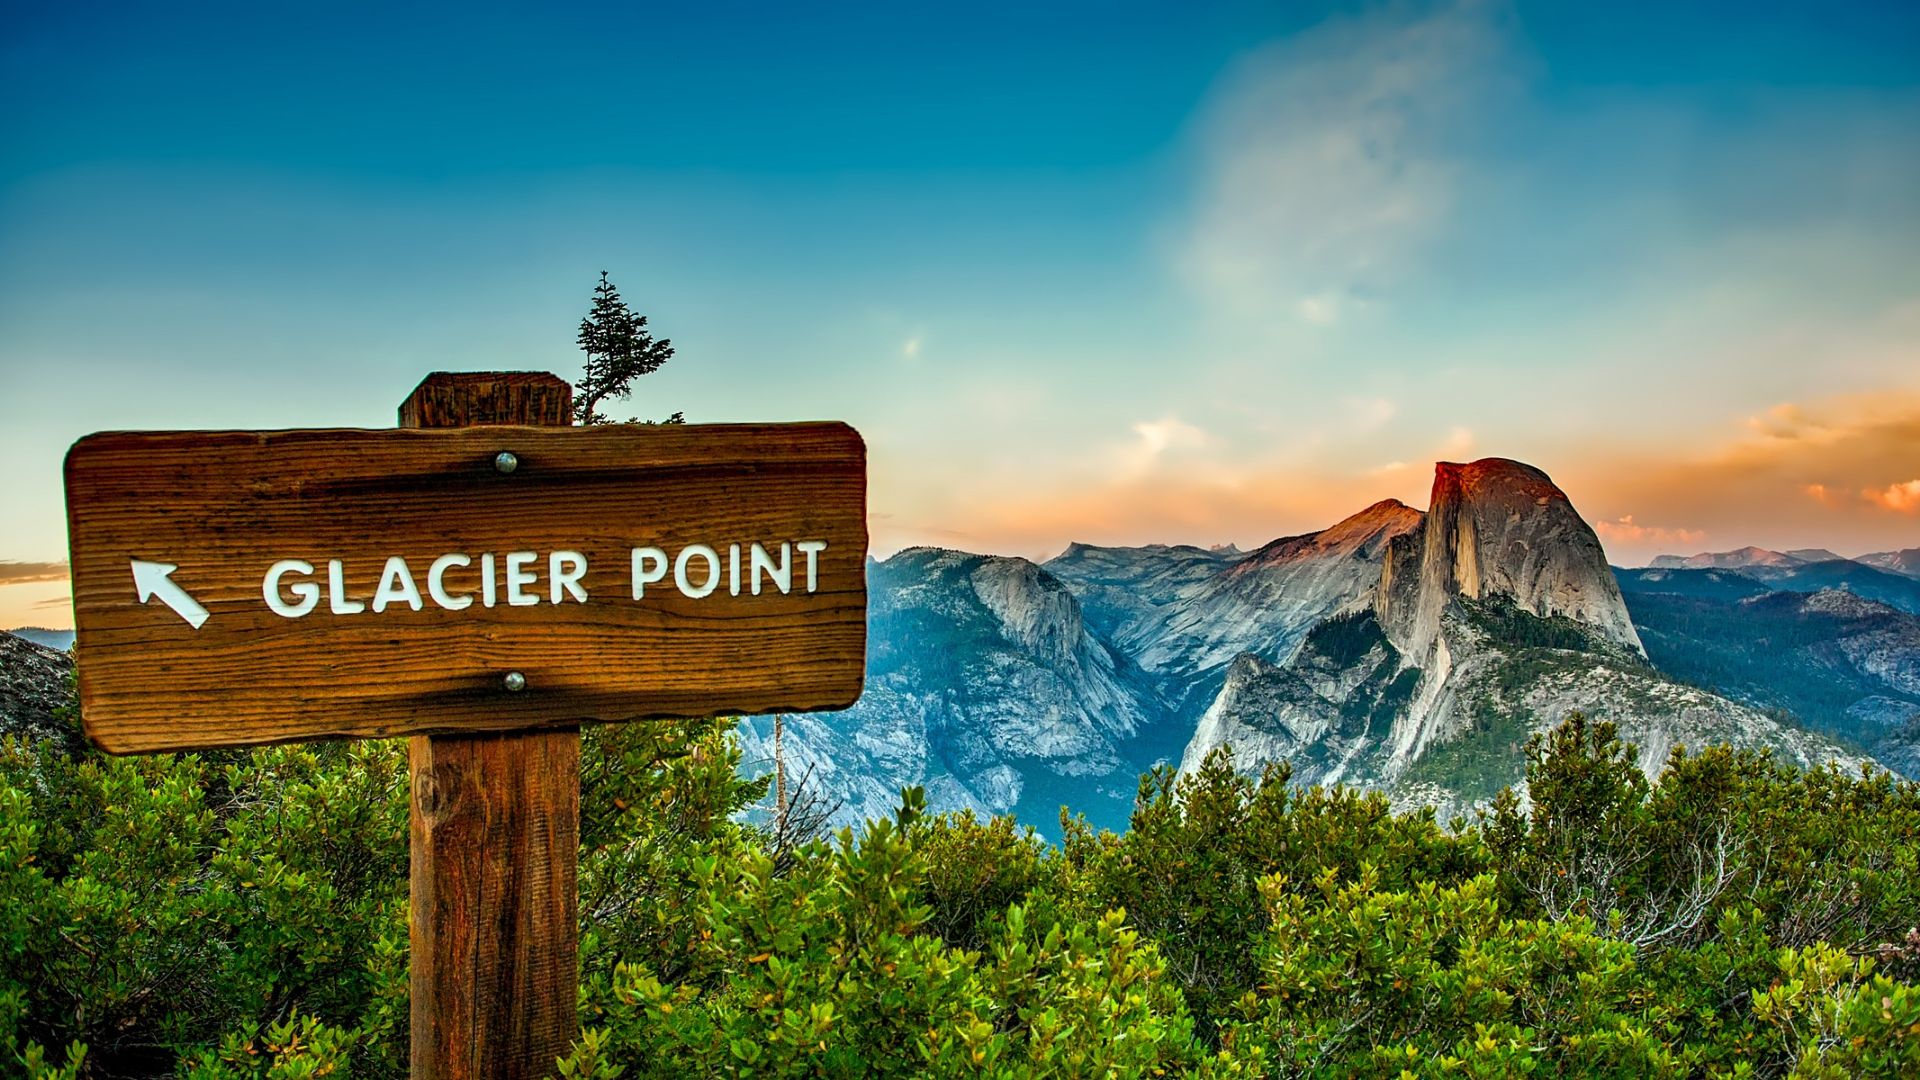
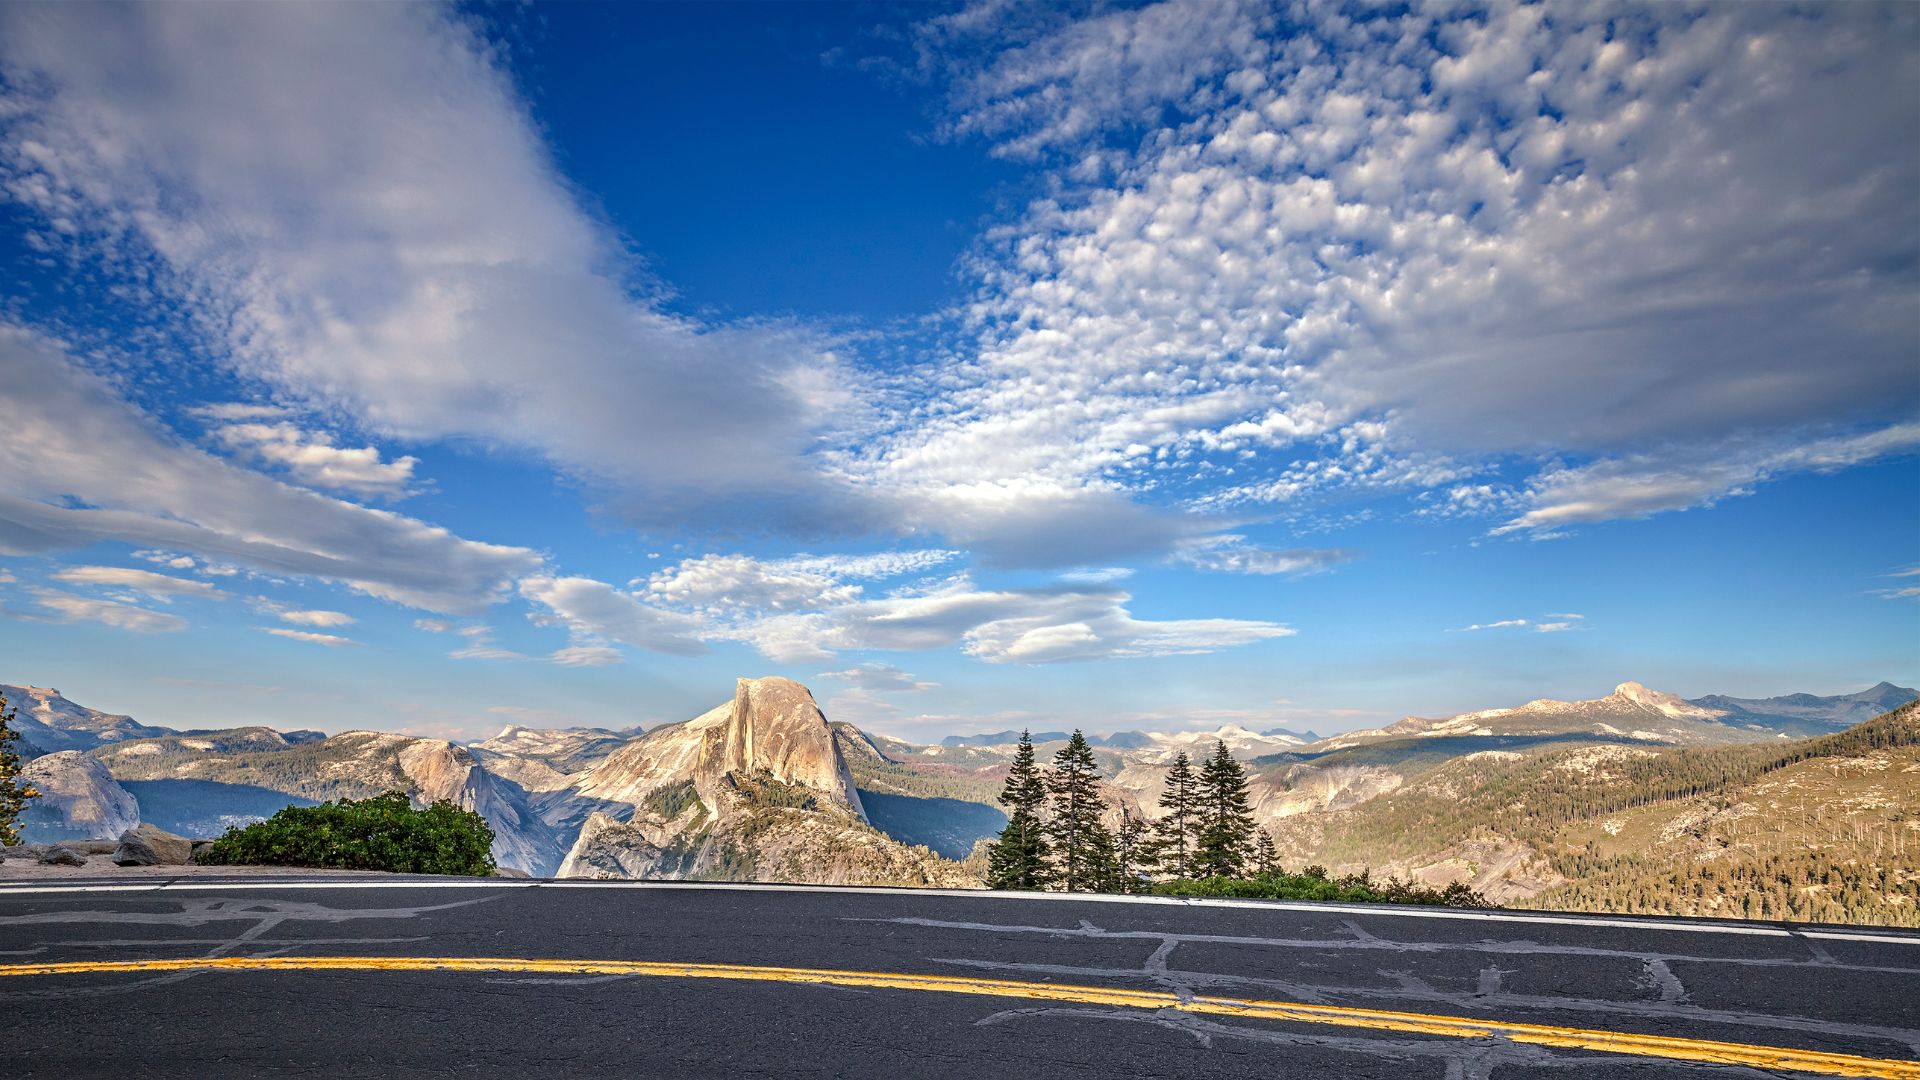
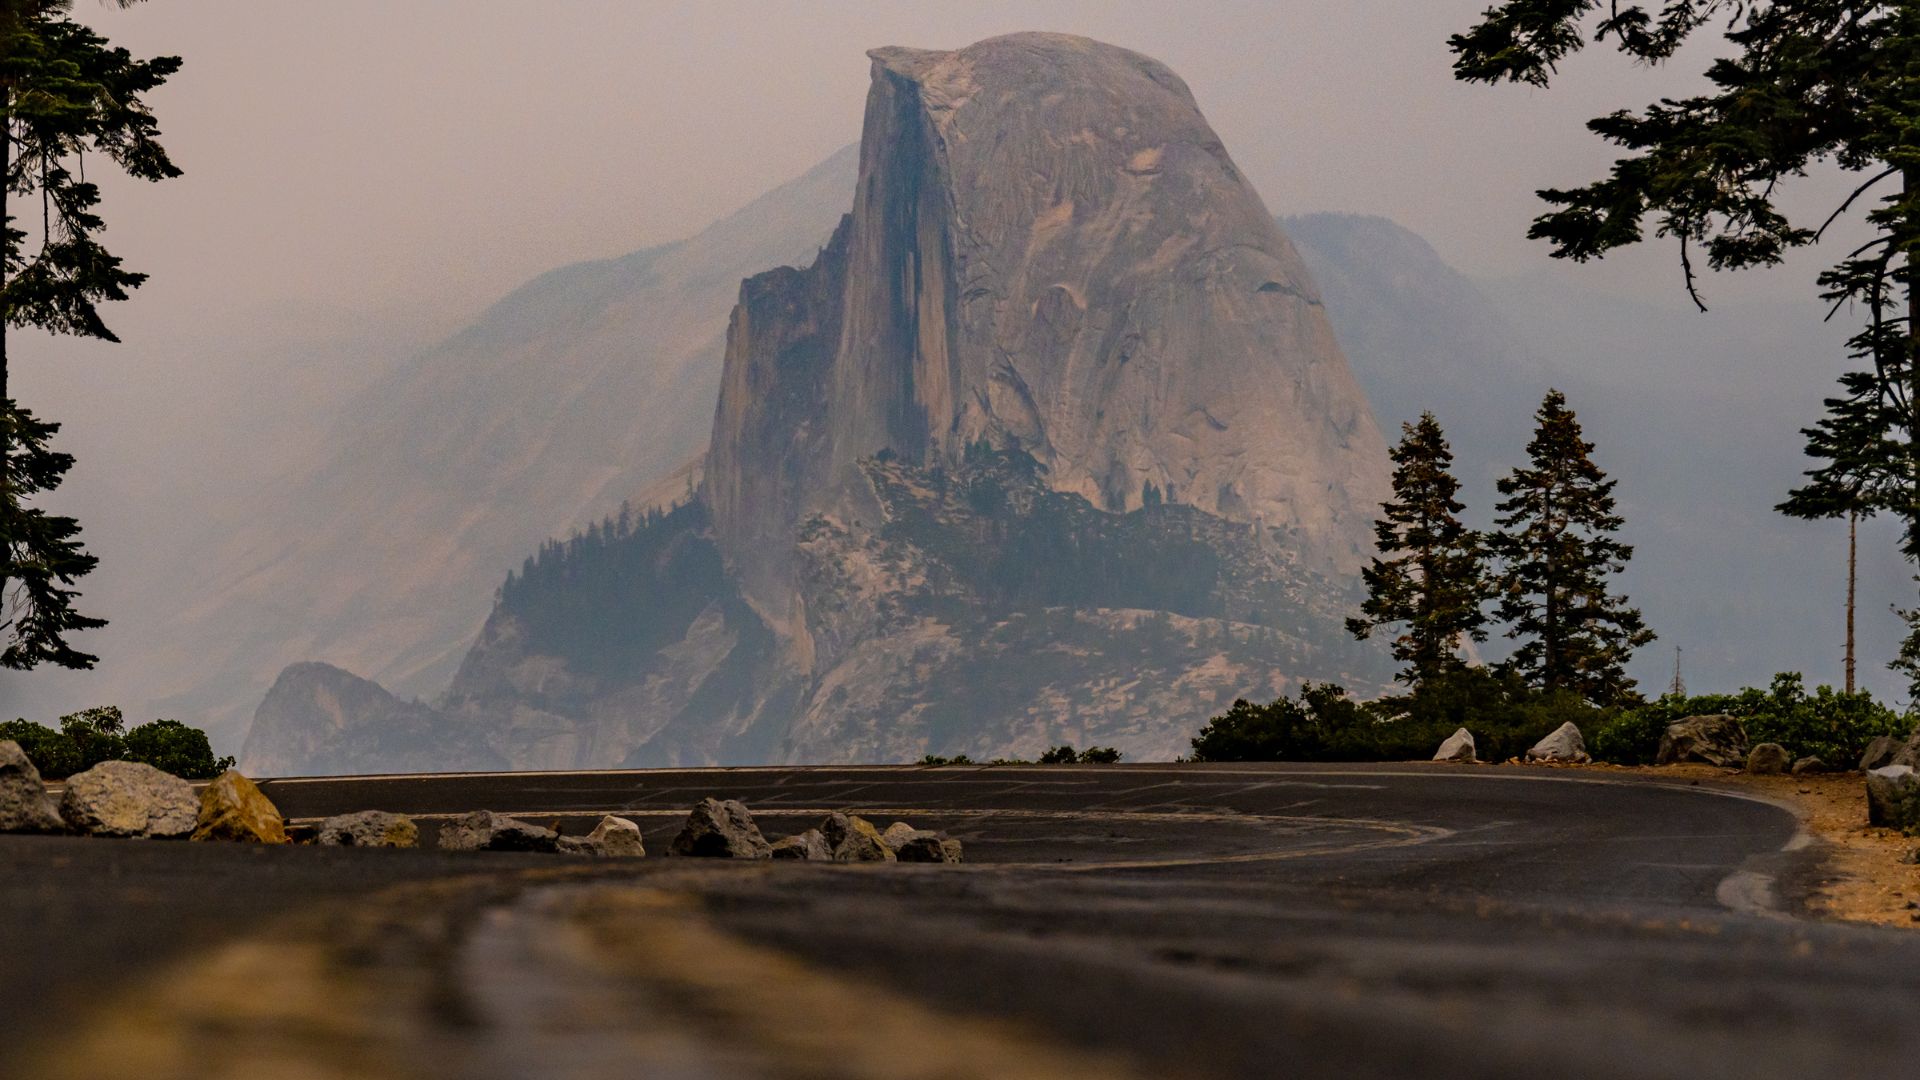
Glacier Point: Sunrise Over the Sierra Nevada Mountains
Sunrise at Glacier Point is something else, but it takes some prep. The 7,214-foot elevation changes the game, especially for your camera gear.
Technical Challenges and Camera Settings at Glacier Point
I learned pretty quick that Glacier Point’s altitude drains my camera battery way faster than at sea level—sometimes by 30%.
My go-to camera settings:
- ISO: 800-1600 before sunrise
- Aperture: f/8-f/11 for sharpness
- Shutter: 1/60s or faster to keep things steady
I set up my tripod about 45 minutes before sunrise. That’s when the alpenglow lights up Half Dome.
A few hard-earned tips:
- Keep spare batteries warm in your pockets
- Use a polarizer to cut through haze
- Bracket your exposures for those crazy contrasts
Once the sun hits Yosemite Falls in the distance, the light changes fast. I switch to spot metering on Half Dome to keep the exposure in check.
Seasonal Changes and Accessibility
Glacier Point Road closes from November to May—sometimes longer if the snow sticks around. The sweet spot for sunrise is June through October.
When to go:
- Summer: Road’s open all day, but it’s busy
- Fall: Still open, but way fewer people
- Winter/Spring: Road’s closed—you’d need skis
The road usually opens in late May, but sometimes snow lingers until June. I always double-check before making the drive up.
Best sunrise timing:
- June: Sunrise at 5:45 AM, waterfalls are raging
- September: 6:30 AM, usually clear
- October: 7:00 AM, golden aspen leaves
Weather can surprise you at this elevation. I’ve seen frost in July up there while the valley below felt like summer.
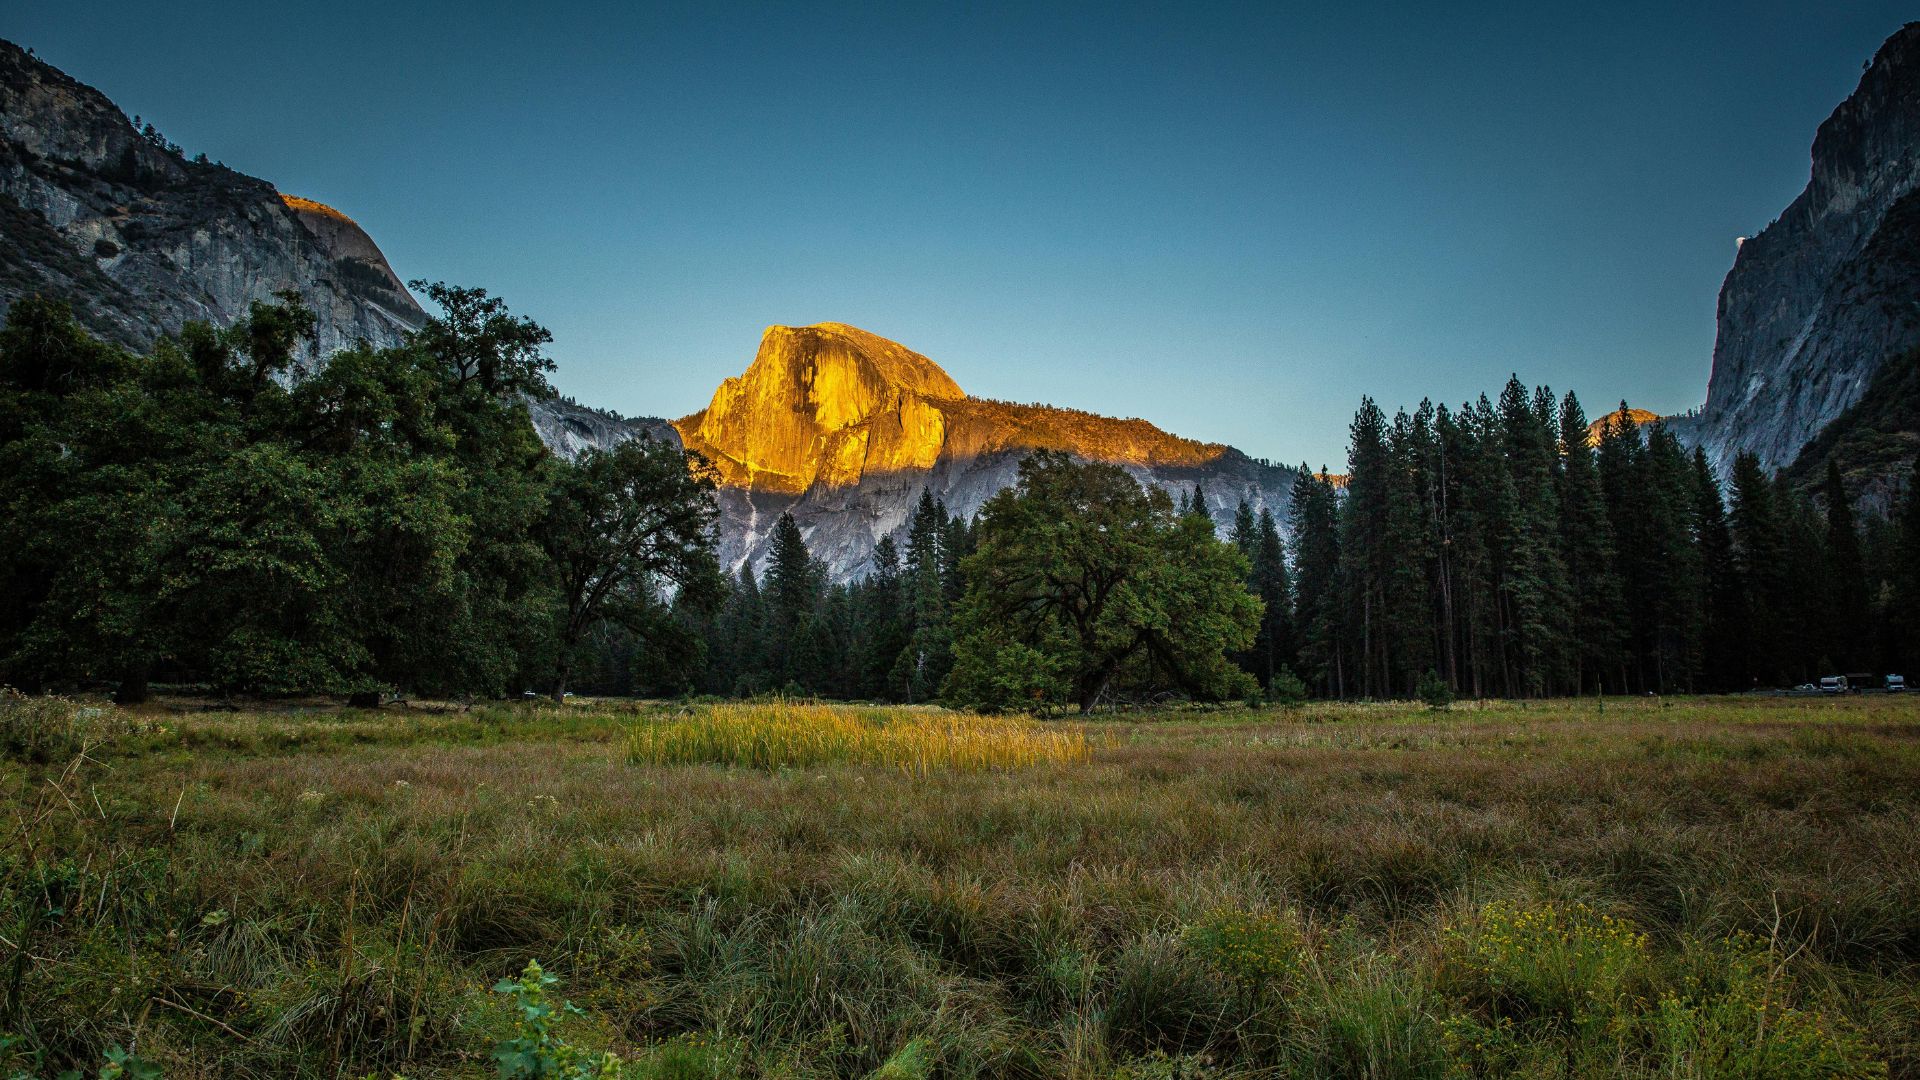
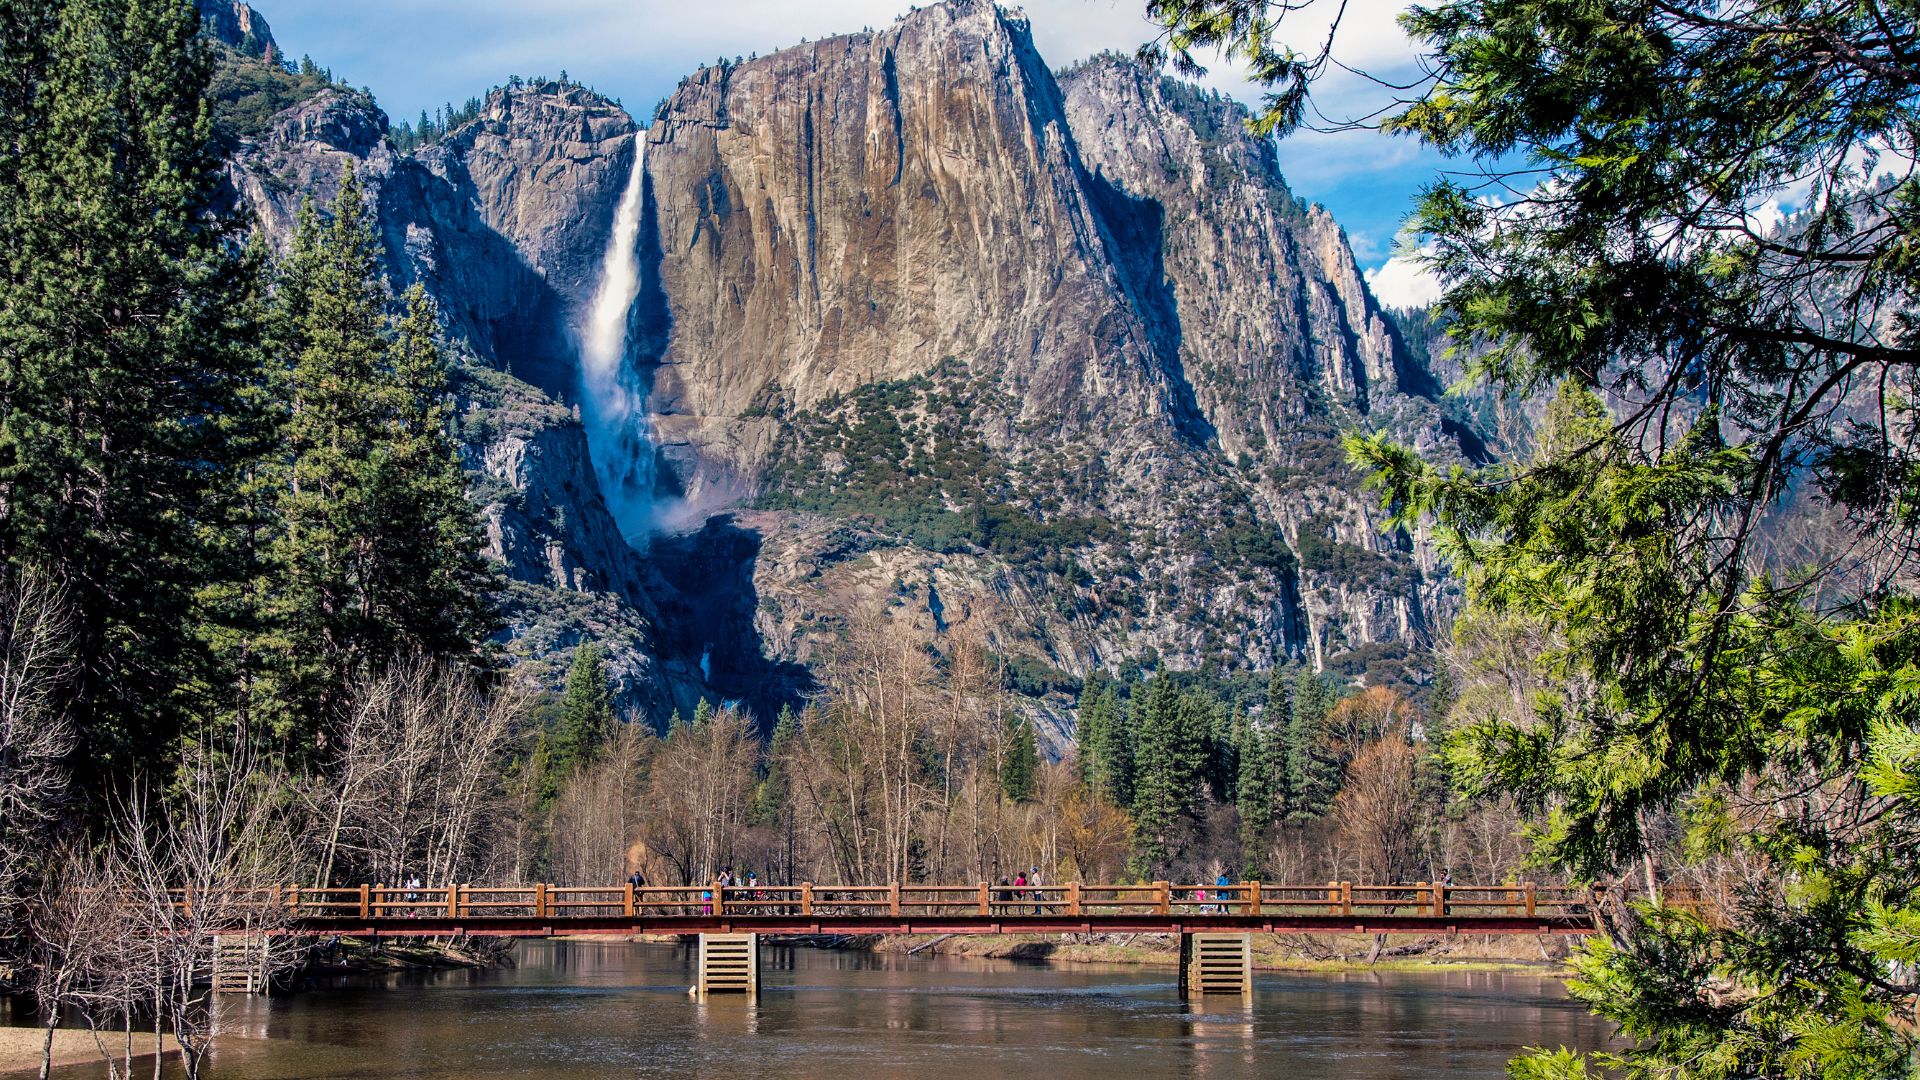
Yosemite Falls & Cook’s Meadow: Waterfalls and Reflections
Yosemite Falls is just epic—2,425 feet of water crashing down. There are several vantage points, but Cook’s Meadow is my favorite for those dreamy reflection shots.
Best Angles for Capturing Upper and Lower Yosemite Fall
I get my favorite photos of Yosemite Falls from three spots along the valley floor.
The classic straight-on view from the Lower Yosemite Fall trailhead lets you see both the upper and lower falls at once.
For a different look, I walk about 200 yards east of the main area. This separates the two falls in the frame and adds more depth.
My waterfall settings:
- Shutter: 1/4 to 1 second for that silky look
- Aperture: f/8 to f/11 for sharpness
- ISO: 100-200 to keep things clean
The best light usually hits late morning. I skip midday because the shadows get too harsh and the contrast is a pain.
Shooting Reflections from Cook’s Meadow Loop
Cook’s Meadow Loop is where you’ll find those perfect waterfall reflections. The flat, 1-mile trail winds past seasonal pools that mirror Yosemite Falls during spring runoff.
I walk the loop to hunt for the clearest water. The best spots change with the weather and water levels.
How I get the best reflections:
- Go early when the water’s calm
- Use a polarizer to cut glare
- Focus on the reflection itself
- Add some meadow grass to the foreground for texture
By late summer, most pools dry up, so I plan these shots for April to June. Early mornings always give me the calmest water and softest light.
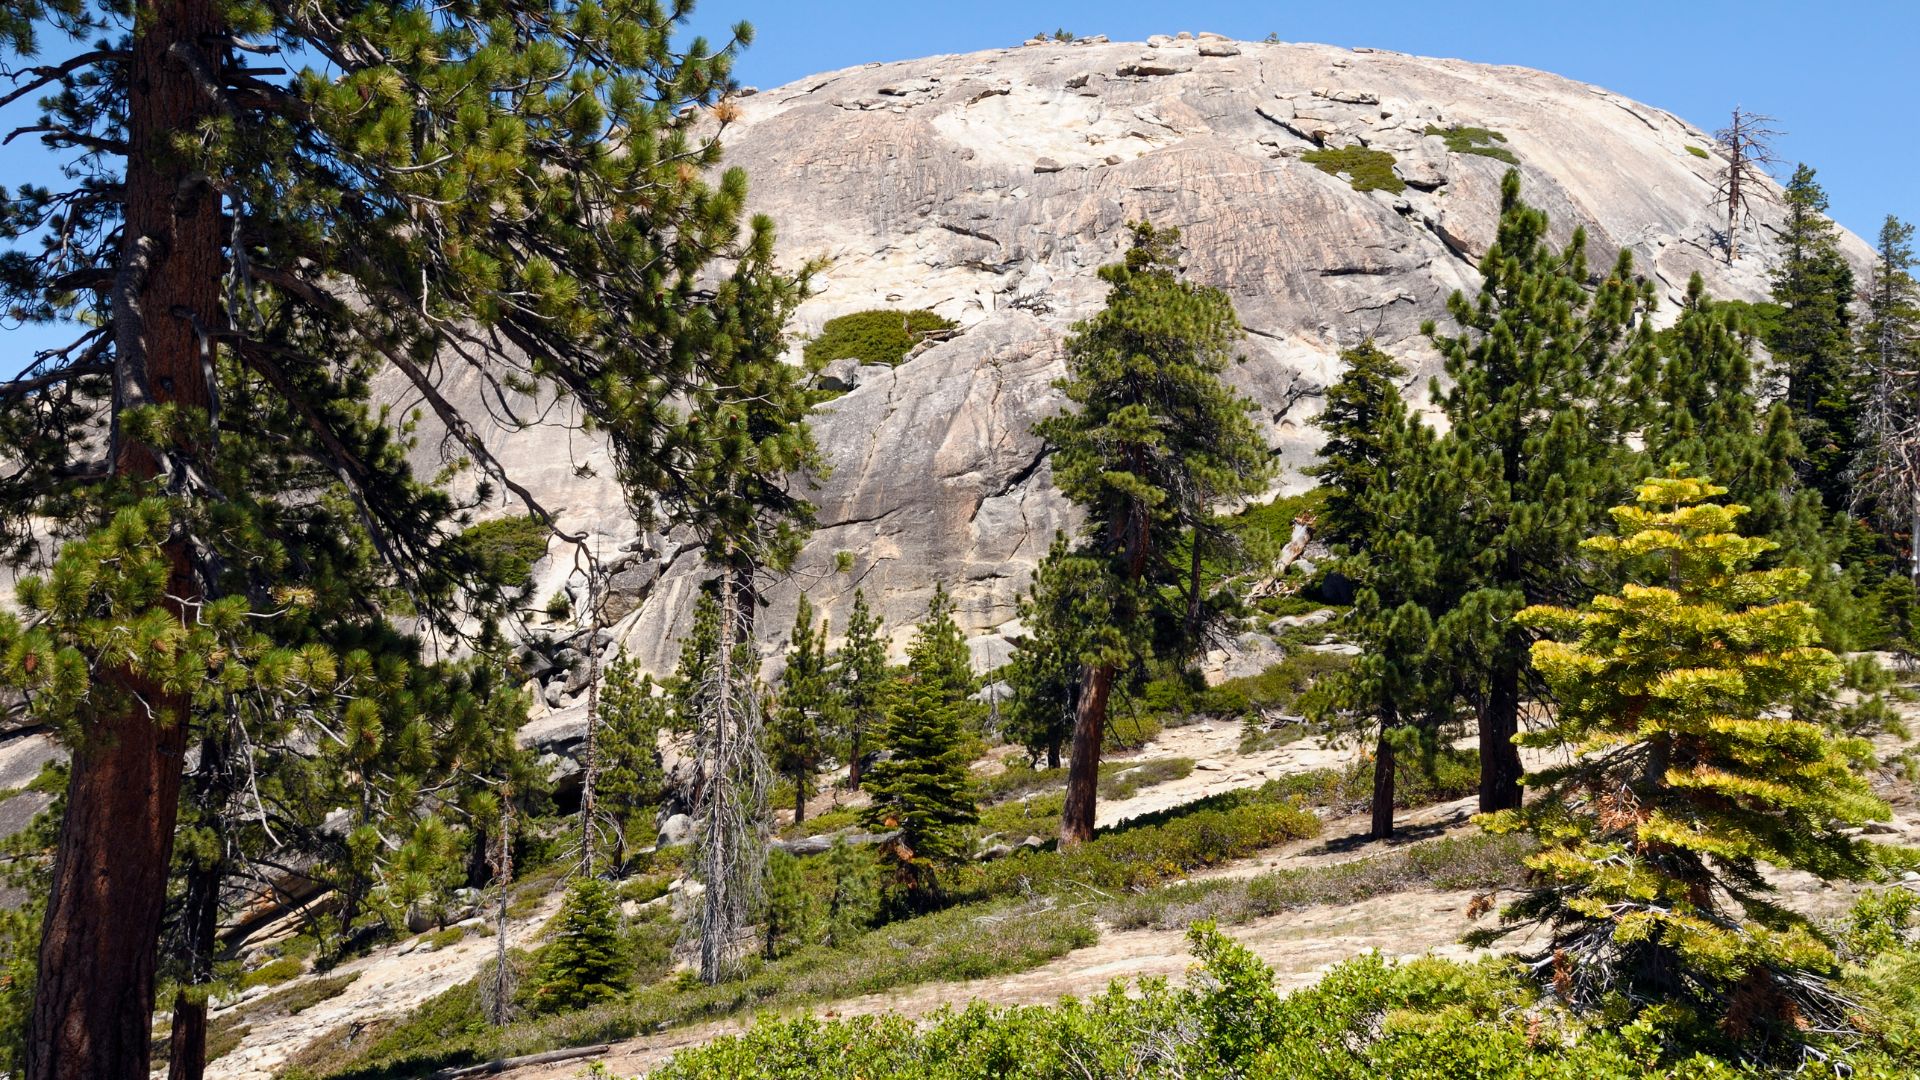
Taft Point & Sentinel Dome: Dramatic Granite Cliffs and Epic Skies
Taft Point and Sentinel Dome are two of the easiest ways to get those wild, dramatic views over Yosemite Valley. The granite drops are dizzying, and the open views are perfect for sunrise—or even some night sky magic.
Hiking to the Perfect Vantage Points
Both trailheads start along Glacier Point Road. I hit the trail early to dodge crowds and catch better light.
Taft Point is an easy 2.2-mile round trip with barely any elevation gain. The trail winds through the forest, then suddenly opens up to those famous cliffs. I usually set up near the edge for shots looking straight down into the valley.
The Fissures—those deep cracks in the granite—make for awesome natural frames.
Sentinel Dome is a bit steeper, 1.8 miles round trip with 400 feet of gain. The last bit is a scramble up smooth rock, but if you stick to the northeast side, it’s not bad.
Once you’re on top, you get full-circle views—Half Dome, El Cap, Yosemite Falls, all of it.
Trail advice:
- Bring a headlamp if you’re starting before sunrise
- Wear shoes that grip granite
- Always check if Glacier Point Road is open (usually May-November)
Golden Hour and Astro Photography at Sentinel Dome
Sentinel Dome’s open summit is unbeatable for sunset and stargazing. For astrophotography, I actually prefer it to Taft Point since you get 360-degree views with nothing in the way.
During golden hour, I like to set up so the last light hits the granite just right. The smooth dome bounces light onto your foreground—super handy.
At night, I set my tripod right on the rock and use the dome’s curves to lead the eye toward the Milky Way.
My camera settings:
- Golden hour: f/8–f/11, ISO 100–400, play with shutter speeds
- Astro: f/2.8, ISO 3200–6400, 20–25 second exposures
At 8,122 feet, you’re above a lot of the haze. Batteries die fast in the cold, so I always pack extras.
Safety’s a big deal here. I mark my route down with little lights and stay well back from the edge after dark.
More Must-See Yosemite Valley Spots and Photo Tips
There’s more to Yosemite than just the classic viewpoints. Over the years, I’ve stumbled onto a few lesser-known spots that give you fresh angles on those famous cliffs and rivers.
These hidden gems are worth exploring if you want something a little different for your next Yosemite photo adventure.
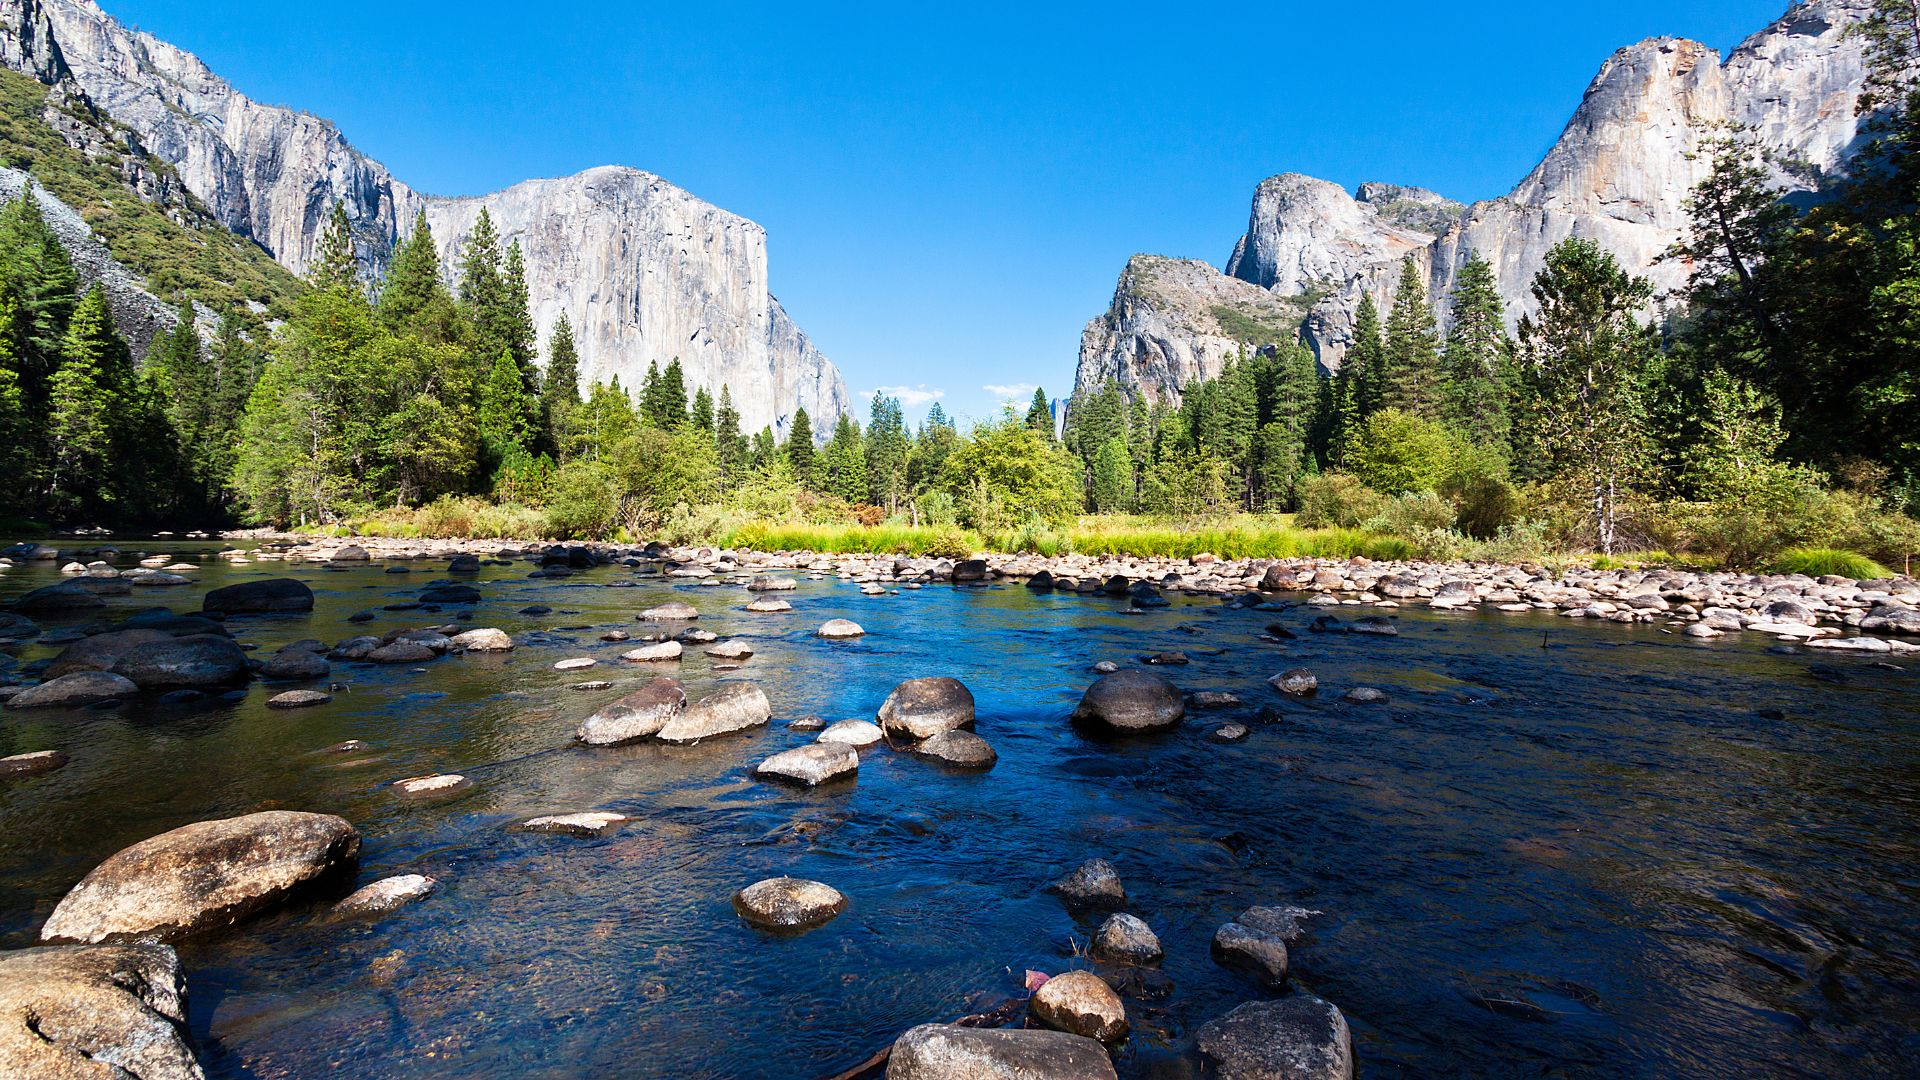
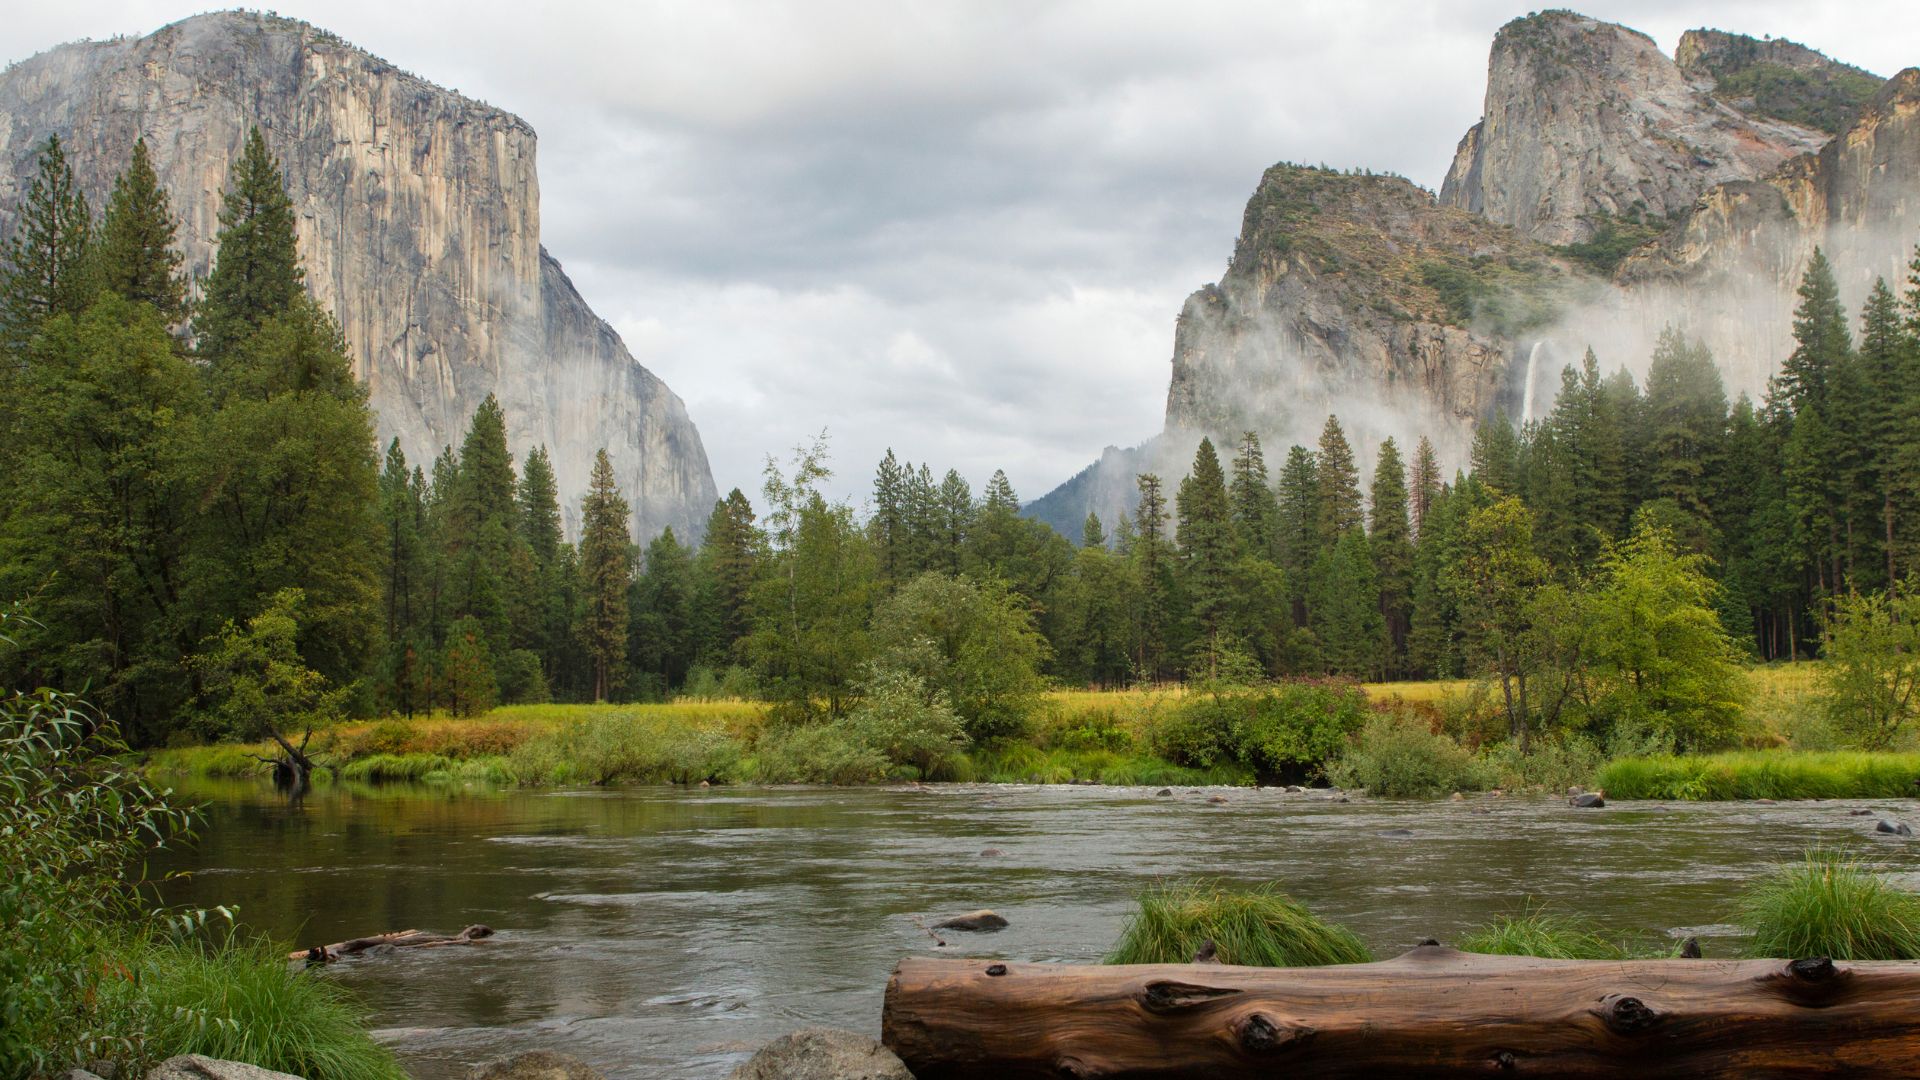
Valley View: The Merced River and the Iconic Valley Frame
Valley View sits right at the western edge of Yosemite Valley, where the Merced River just meanders through the meadows. Honestly, I think this spot gets overlooked far too often for capturing the sheer breadth of the valley.
You get this amazing blend of El Capitan, Bridalveil Fall, and Cathedral Rocks all in one shot. I’ve shot here at sunrise and sunset—each time, the light hits the granite in a totally different way.
Best shooting times:
- Sunrise: Soft light on El Capitan, sometimes there’s a bit of fog if you’re lucky
- Sunset: Warm golden hour light on the valley walls
The parking lot? It fills up fast. I usually show up at least 45 minutes early, just to be safe. I always toss a polarizing filter in my bag—it really cuts the glare on the river and makes the rocks pop.
For composition, I like to use the river as a leading line, guiding the eye toward those distant peaks. If the water’s calm, you get these gorgeous reflections, which usually happens in the early morning or late evening.
Sentinel Bridge and Mirror Lake: Reflections of Yosemite’s Icons
Sentinel Bridge is where you’ll find that classic Half Dome reflection shot you see everywhere. I usually set up on the bridge, facing upstream toward Half Dome for the best view.
The bridge crosses the Merced River and gives you a solid, steady spot for your tripod. I prefer shooting here during blue hour—the sky’s even, the water’s calm, and the light just feels right.
Mirror Lake’s reflections depend on the season and water levels. In spring, you’ll catch perfect mirror images of the granite domes. By late summer, the lake almost disappears and turns into a meadow.
Key shooting tips:
- Bring a wide-angle lens (14-24mm works great) for shots from the bridge
- Pack a neutral density filter if you want those dreamy long exposures
- Check the water levels before heading to Mirror Lake
I like to wander the whole Mirror Lake loop trail, searching for different angles and reflections. Honestly, the best photos often come from the far end of the lake, where you’ll barely see another soul.
Bonus: Horsetail Fall, Mariposa Grove, and Off-the-Beaten-Path Locations
Horsetail Fall puts on that wild “firefall” show every mid-February—if you get lucky with the conditions. I’ve chased this phenomenon twice now, and honestly, timing makes or breaks it.
You need water flowing, skies clear as can be, and the sun sliding into just the right spot to light up the falls. I usually find myself wandering the valley floor weeks ahead, hunting for the perfect angle.
Mariposa Grove? It’s a wonderland of giant sequoias. I like to bring a telephoto lens and try to capture those massive trunks, squeezing them into frame with the smaller trees for a sense of scale.
Some lesser-known favorites:
- Swinging Bridge: You’ll get river access and a killer view of El Capitan.
- Cathedral Beach: Super peaceful, and the meadows are perfect for photos.
- Southside Drive: There are a few roadside pullouts where you can catch mountain reflections—totally worth a stop.
You’ll need to hike a bit more to reach these spots, but you’ll probably have them to yourself. I always toss extra batteries and memory cards in my bag, because I end up shooting way longer than I expect.
If you want something different, try wandering and just see where you end up. Patience pays off. I rarely settle for the first view—usually, the magic happens after exploring a little more.