After hiking hundreds of miles along California’s coastline, I have to admit—nothing compares to the Lost Coast Trail when it comes to both challenge and reward. This wild, 25-mile stretch in Northern California’s King Range demands more than just strong legs; you’ve got to respect the ocean, plan ahead, and be ready for whatever the coast throws at you.
But what really sets this trail apart? It’s not just the jaw-dropping scenery or how remote it feels. The Lost Coast combines a bunch of challenges that’ll test even seasoned backpackers, while treating you to glimpses of California’s wild side that most folks never see.
You’ve got to plan around the tides, haul your pack over shifting sand, and keep your wits about you. Every step demands attention.
I’ve learned—sometimes the hard way—that understanding the trail’s quirks before you set out is key. Permits, shuttles, tricky tidal zones, and the right gear all make the difference between an epic adventure and a rough survival story.
Why the Lost Coast Trail Stands Apart
No other California coastal hike offers what the Lost Coast does: 25 miles of untouched, wild coastline. Here, you’ll find terrain so gnarly that Highway 1 couldn’t even make it through.
This place is legendary for its isolation and rugged beauty.
Rugged and Remote Terrain
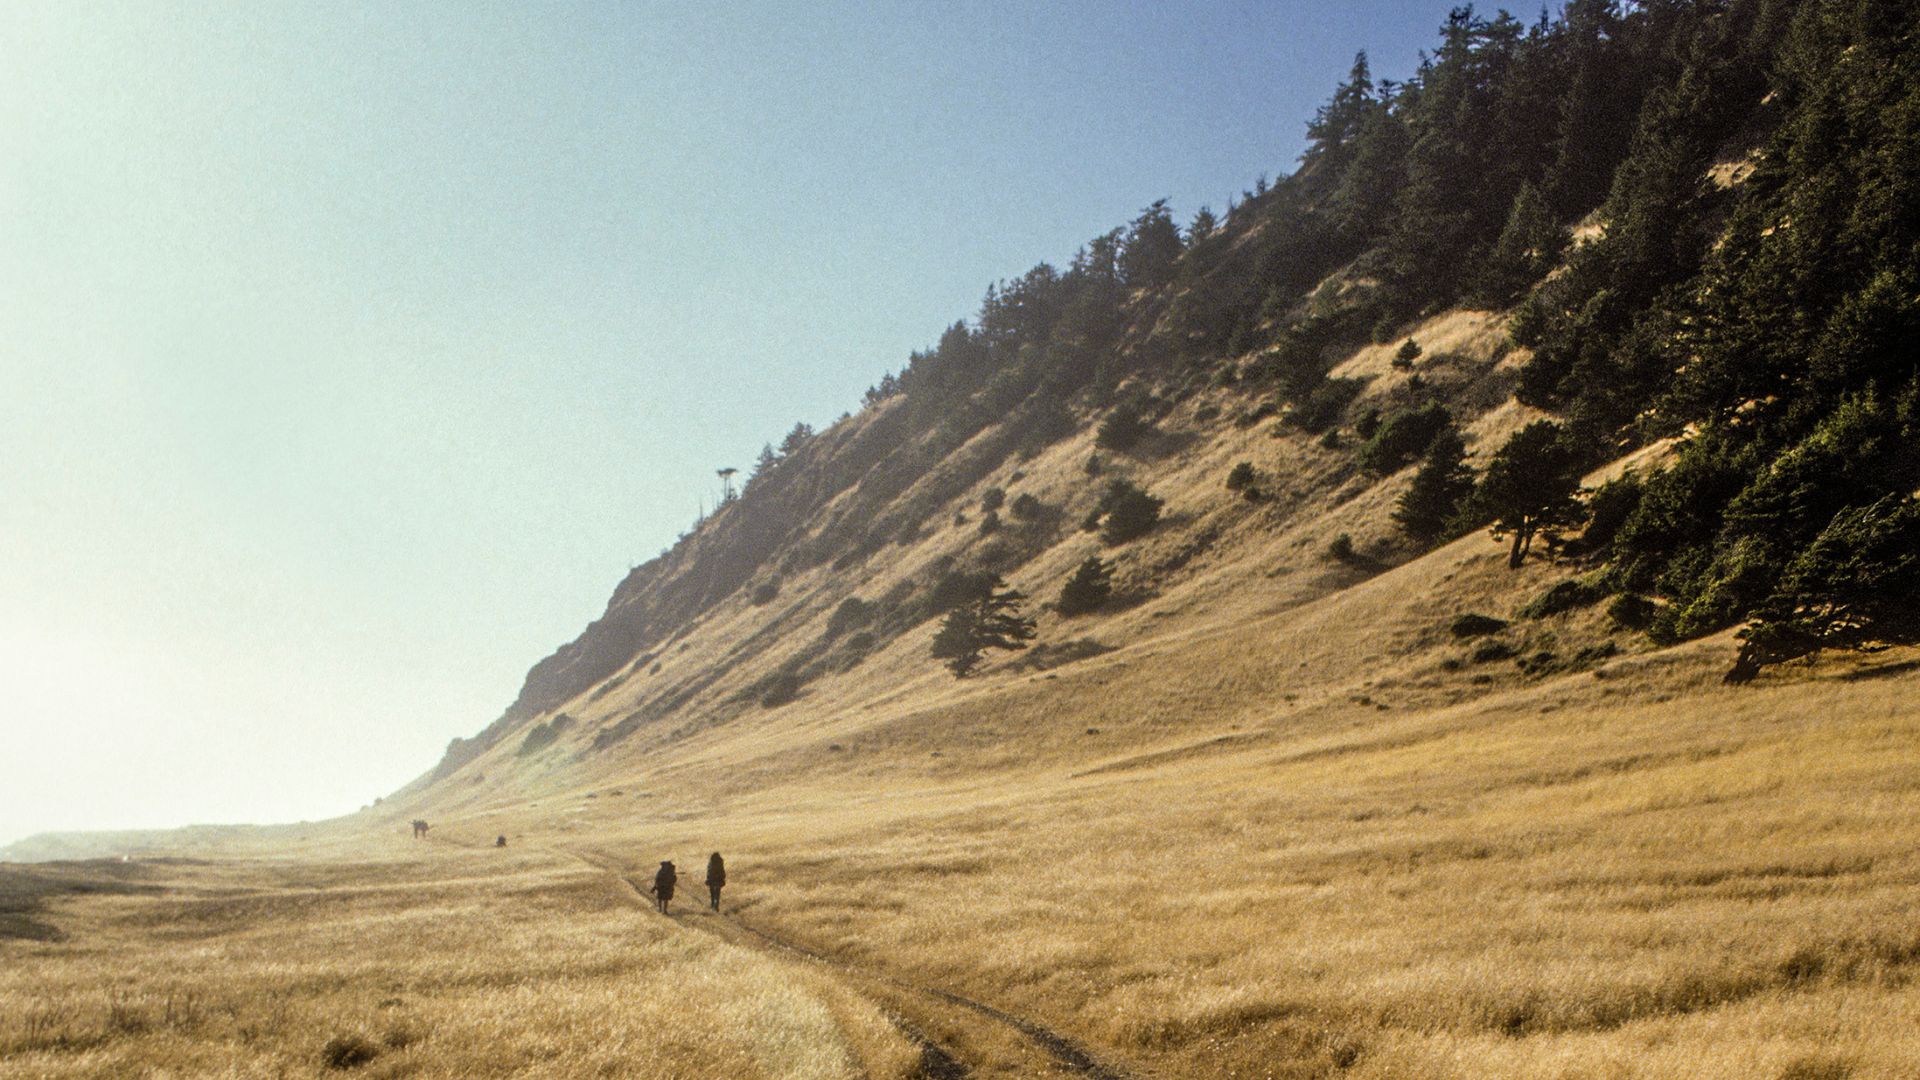
I’ve never seen terrain like this anywhere else on the California coast. The trail winds through the King Range National Conservation Area, where cliffs shoot straight up from the Pacific.
The surface keeps you guessing. One minute you’re slogging through coarse black sand, the next you’re hopping over giant, wave-smoothed stones.
You’ll bounce between pebbly beaches and slick rock outcrops.
But the real kicker? Tide-dependent sections. Three big stretches turn into no-go zones except at low tide. If you don’t plan for these, you’re in for a long, wet wait.
There’s no cell service here. None. The nearest big city, San Francisco, is over five hours away by car. If something goes sideways, help isn’t coming fast.
Historical Significance and Development
They called it the Lost Coast for a reason—it got “lost” to modern development. When planners tried to run Highway 1 down this part of the coast back in the early 1900s, the King Range mountains said, “Nope.”
The mountains rise so sharply from the ocean that building a road was just too risky and expensive. Highway 1 had to veer inland, leaving this coastline untouched.
Because of that, we still have the longest stretch of undeveloped coastline in California. While other places got roads and houses, the Lost Coast stayed wild.
Eventually, the area became the King Range National Conservation Area, which locked in its protection. You can hike for days out here and never see a single building.
Comparison to Other California Coastal Hikes
Most California coastal hikes? Sure, they’re beautiful, but they’re not true wilderness. Trails in Big Sur or Point Reyes have road access, cell service, and usually a crowd.
The Lost Coast Trail is a different animal. You need permits, a bear canister, and real backpacking chops. Most other hikes are easy day trips.
Here’s what stands out:
- Accessibility: Most trails have parking lots and info signs
- Difficulty: You rarely need tide charts or to ford creeks elsewhere
- Isolation: Solitude is the real deal here
Even the tough coastal hikes up in Olympic National Park don’t quite match the Lost Coast’s mix of rugged terrain and total remoteness. Walking here feels like stepping back centuries.
Planning and Logistics for Hikers and Backpackers
You can’t just show up and hike the Lost Coast Trail. You’ll need to lock down wilderness permits, arrange a shuttle between trailheads, and figure out your route and campsites.
Securing Permits and Campgrounds
A King Range wilderness permit is a must for any overnight trip. I always book on Recreation.gov as soon as dates open up.
Permit Details:
- Needed for all overnight backpacking
- Group size maxes out at 8-10 (varies by season)
- Bear canisters are non-negotiable
- No campfires allowed anywhere
Permits go fast during peak season (May through October), so have backup dates in mind.
You can camp at several spots along the trail. Big Flat and Spanish Flat are the favorites. Sea Lion Gulch is another choice, but it’s noisy—those sea lions don’t sleep.

Trailhead Locations and Transportation
The trail stretches 25 miles between two main trailheads. Mattole Beach is up north, and Black Sands Beach in Shelter Cove is at the southern end.
Trailhead Info:
- Mattole Beach: Super remote, basic parking and restrooms
- Black Sands Beach: In Shelter Cove, with a few more amenities
- No cell service at either trailhead
Getting there isn’t quick. The road to Mattole Beach is narrow and winding, about 1.5 hours from Highway 101. Black Sands Beach is easier to reach but has a steep access road.
I like to arrive the night before so I can sort my gear and get a jump on the day.

Choosing Hiking Direction and Itineraries
Most people hike north to south, starting at Mattole Beach and finishing at Black Sands Beach. You’ll have the wind at your back and end near some creature comforts.
Typical Itineraries:
- 3 days: The sweet spot for challenge and enjoyment
- 4 days: More relaxed, shorter hiking days
- 2 days: Only if you’re fast, fit, and travel light
I usually go for the 3-day plan. It lets you linger at tide pools and spot wildlife.
Always plan your days around the tides. Those three impassable sections aren’t forgiving.
Organizing Shuttles and Shuttle Services
Unless you’ve got two cars, you’ll need a shuttle. The trailheads are about 2.5 hours apart by road.
Shuttle Choices:
- Lost Coast Adventure Tours: My go-to for reliability
- Other private shuttles: A few local options
- Ride shares: Sometimes hikers coordinate rides
Book your shuttle at least two weeks ahead, especially in peak season.
Most services pick up at both trailheads and can drop you at local hotels. Some even offer gear storage.
Expect to pay $75-150 per person for the ride, depending on your group size and pickup spot.
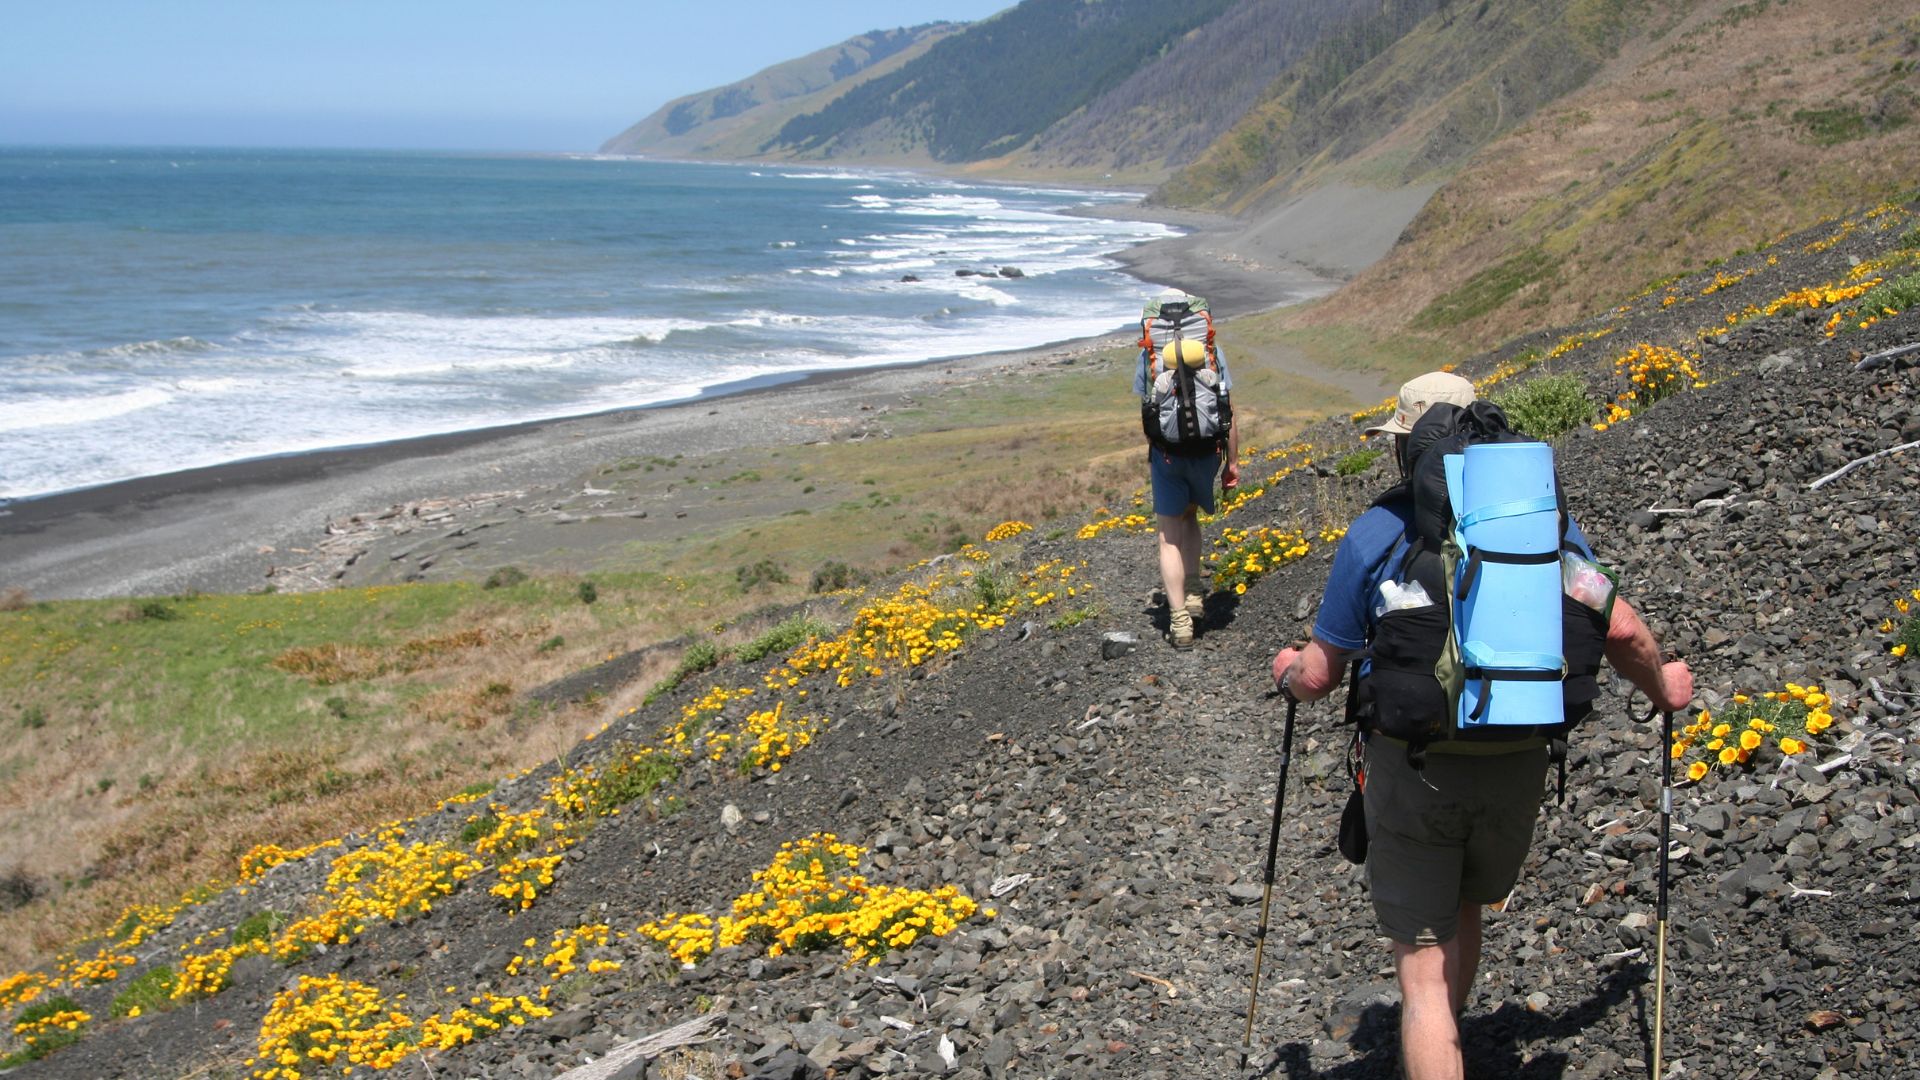
Trail Challenges: Tidal Zones, Safety, and Hazards
The Lost Coast Trail isn’t just a walk on the beach. Tidal zones, unpredictable weather, and wildlife all demand respect. One careless moment, and your adventure could get sketchy fast.
Navigating Impassable Zones and Tides
On the Lost Coast, the Pacific Ocean calls the shots. Certain stretches vanish under water at high tide, so you need to time your hike carefully.
I always pull up tide charts before I even pack my bag. The riskiest spots are rocky headlands where the waves slam right onto the trail. If you miss your window, you’re stuck for hours.
Key Tidal Zones:
- Punta Gorda to Lighthouse: Only safe for 2-3 hours around low tide
- Big Flat Creek area: Passable from two hours before to two hours after low tide
- Randall Creek to Spanish Flat: Check those tide charts obsessively
Sneaker waves are no joke. I’ve watched them surge 20 feet higher than the normal surf, sweeping gear and people off their feet.
Tide Safety Reminders:
- Download tide charts for your whole trip
- Camp with tidal windows in mind
- Never turn your back to the ocean
- Stay at least 50 feet from the water when you can

Understanding Weather Risks and Terrain
Weather here is wild. I’ve shivered in foggy mornings and sweated under the afternoon sun—all in one day.
Rain and Wind:
- Sudden storms can roll in and stick around
- Winds often blast past 30 mph
- Creeks turn treacherous during rain
- Hypothermia’s a real threat, even in summer
The ground underfoot doesn’t make things easier. Loose rocks and steep slopes demand constant focus. Boulder fields are ankle-twisters, especially when they’re wet.
Streams can swell overnight if it rains. I’ve seen Randall Creek go from a trickle to a chest-deep wade in less than 24 hours. Always have a backup plan for crossings.
Must-Have Gear for Weather:
- Waterproof jacket and pants
- Warm layers for chilly nights
- Boots with solid ankle support
- Emergency shelter for storms
Wildlife Awareness: Black Bears, Otters, and More
Black bears roam the King Range and sometimes wander right onto the beaches. I’ve bumped into bears three times—once, one got into a poorly stored food bag.
Bear Safety Basics:
- Always use a bear canister
- Don’t leave food out, ever
- Make noise in thick brush
- Camp away from water where bears drink
Sea otters and marine mammals are fun to watch but keep your distance. I stay at least 50 feet back. Disturbing them can get you a hefty fine.
Other Critters:
- Rattlesnakes show up in grassy patches when it’s warm
- Seagulls can get aggressive and steal your snacks
- Poison oak is everywhere, especially at campsites
- Ticks are common and carry Lyme disease
Mountain lions are around, but I’ve never seen one on the beach. I carry bear spray just in case.
And don’t forget: if someone gets in trouble, you can’t just call for help. There’s no cell service for most of the trail.
Essential Gear and Preparation for Success
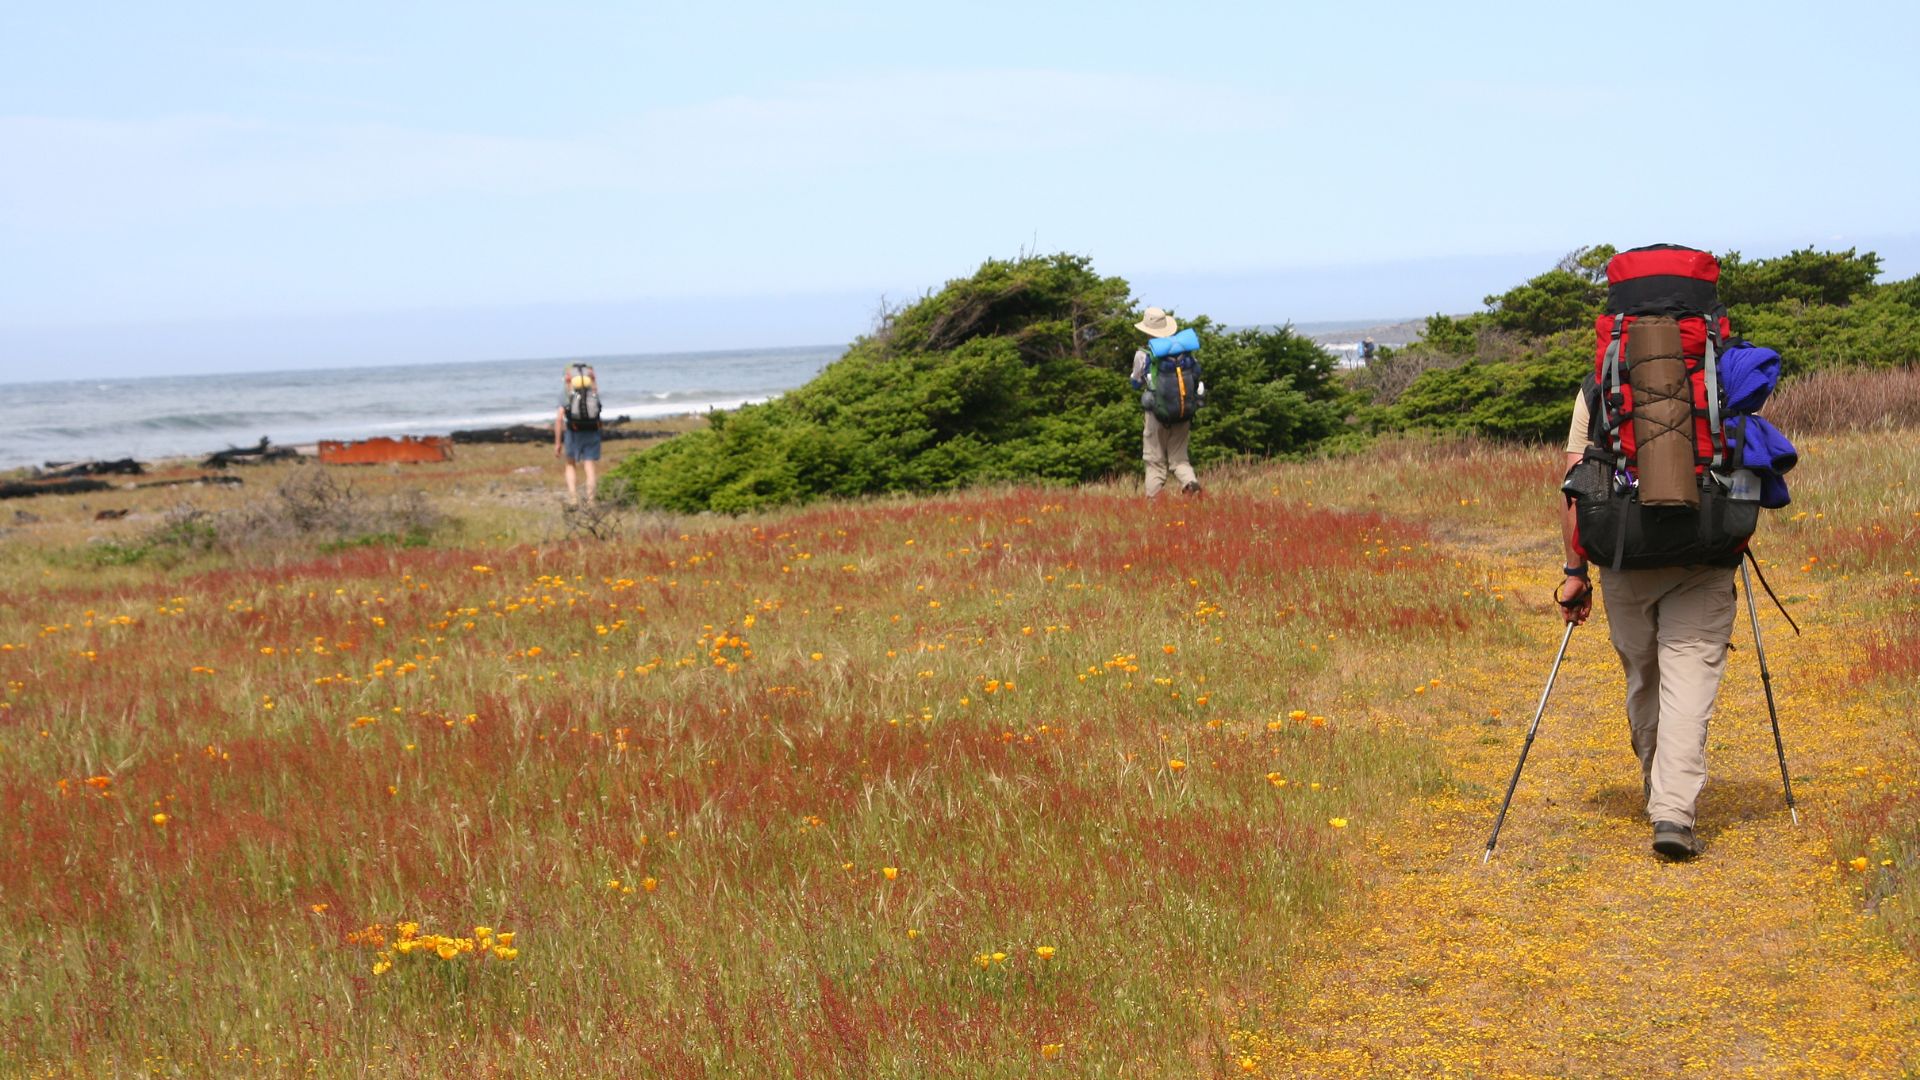
This trail is tough on gear. You’ll need stuff that can handle wet, sandy, unpredictable conditions. Bear canisters are required, rain gear is a must, and trekking poles are worth their weight in gold.
Bear Canisters and Food Storage
Bear canisters are non-negotiable here. I like the BearVault BV500 or the Garcia Backpacker’s Cache.
The BV500 holds 4-5 days of food for one person and weighs 2.7 pounds empty. The Garcia is lighter at 2.1 pounds but a pain to open.
Pack smart—put dense stuff like nuts at the bottom and fill gaps with smaller items.
Keep your canister at least 100 feet from your tent and water. Place it on flat ground, away from cliffs. The wind here can send your canister rolling straight into the ocean.
I always bring a little stuff sack for toiletries and trash—those go in the canister at night, too. Space is tight, so plan meals accordingly.
Recommended Clothing and Protective Equipment
A good rain jacket is your best friend out here. Fog and sudden showers are the norm. I go with a three-layer waterproof with pit zips for airflow.
Rain pants are a must. Wet brush will soak you in minutes. Lightweight, packable pants do the trick.
Bring extra socks and underwear. Sand, salt, and moisture are a recipe for blisters and chafing. Merino wool dries fast and feels better than cotton.
Sun protection matters, even when it’s cloudy. I stick with a wide-brim hat and long-sleeve shirt. The ocean bounces sunlight right back at you.
Pack warm layers. Even in July, nights can dip into the 40s. A lightweight down jacket and a beanie make a big difference.
Trekking Poles and Creek Crossings
Trekking poles? Absolutely essential. They keep you upright on loose rocks and help you ford creeks.
I use adjustable poles that break down for storage. Carbon fiber is lighter, but aluminum holds up better against rocks.
There are several creek crossings, and water can be knee-deep or more. Poles let you gauge depth and steady yourself.
Bring lightweight camp shoes or water shoes for crossings. Keeping your boots dry is huge for foot health. I sometimes use trail runners—they dry quickly.
Practice with your poles before you go. Adjust the length for uphills and downhills.
The last few miles near Black Sands Beach are especially rocky. Poles help save your knees and prevent slips.
Highlighting the Route: Scenery and Key Landmarks
The Lost Coast Trail winds through some of California’s most untouched coastal wilderness. You’ll see dramatic beaches, quirky landmarks, and ecosystems you just won’t find anywhere else.
From the start at Mattole Beach to the iconic Punta Gorda Lighthouse, every section brings new challenges and jaw-dropping views.
Stage One: Mattole Beach to Punta Gorda
The trail kicks off at Mattole Beach, where black sand stretches for miles and waves crash in a steady, hypnotic rhythm. Those first few miles felt mellow as I wandered the shoreline, the Pacific roaring on one side and coastal bluffs towering on the other.
Honestly, the Punta Gorda Lighthouse steals the show in this section. This century-old beacon perches on rocky cliffs about five miles in, and it’s got this wild, remote vibe that’s hard to beat.
I usually aim to reach the lighthouse around lunchtime. There’s shelter from the wind, the views are unreal, and it’s a prime spot for photos.
But things get trickier after Punta Gorda. The trail throws in creek crossings and jumps between soft sand and clifftop paths.
I kept stopping to stare at the scenery—sea stacks jutting out of the surf, endless coastline fading into mist.

Standout Features: Beaches, Creeks, and Coves
What makes this trail so memorable? It’s the wild mix of coastal landscapes.
Black Sands Beach at the southern end really lives up to its name. The volcanic sand is so dark it almost looks surreal next to the foamy waves.
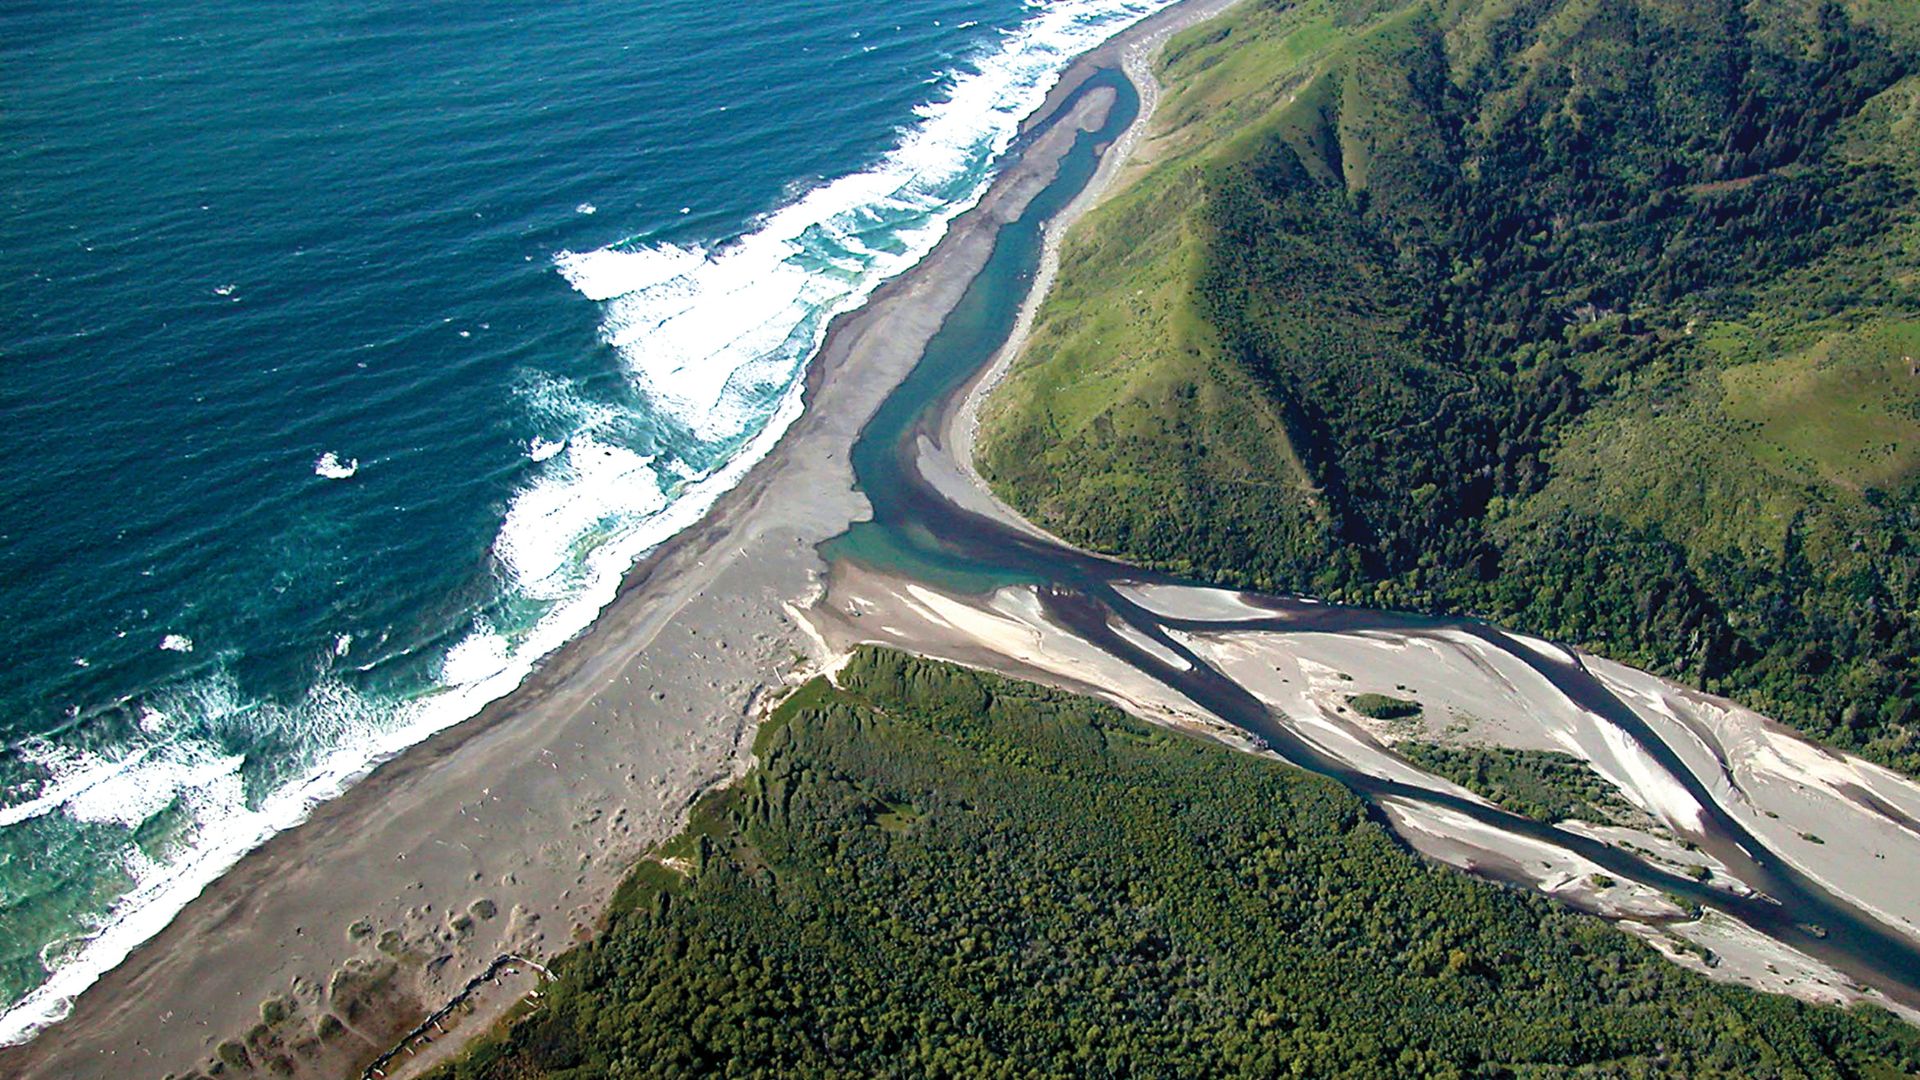
Creek crossings pop up all the time. Randall Creek, Cooskie Creek, and Shipman Creek can get dicey when the water runs high.
I always pack a pair of sandals or water shoes to keep my boots dry. It’s worth it.
Camping at Sea Lion Gulch Camp is something I still talk about. At night, sea lions bark in the distance, and during the day, seals sprawl out on sun-warmed rocks.
The camp sits tucked in a cove, and there’s fresh water nearby—super convenient.
Buck Creek, Gitchell Creek, and Telegraph Creek all offer solid water sources and great places to set up camp. Each creek carves out its own lush little oasis, packed with ferns and wild coastal plants.
Major Trail Camps and Water Sources
Camping here is rustic but absolutely spectacular. Miller Flat and Big Flat are the classic choices, with flat spots for tents and some protection from the wind.
I found these camps perfect for breaking up a multi-day hike:
- Miller Flat: Plenty of room, lots of tent sites, and a creek close by.
- Big Flat: Set higher up, so you get sweeping ocean views and a bit of a wind break.
- Sea Lion Gulch Camp: Wild setting, with sea lions and great wildlife watching.
Water’s usually easy to find, but I always toss in purification tablets just in case. Most camps sit near creeks, so you won’t have to haul water far.
Campfires are allowed in certain areas, but it’s smart to double-check the latest rules before heading out.
Permits and bear canisters are non-negotiable. I can’t stress enough how useful a detailed trail map is—some camps and water spots are easy to miss if you’re not paying attention.
Maximizing Your Experience: Seasons, Tours, and Tips
The Lost Coast Trail rewards good planning with a true wilderness adventure. If you time your trip right, think about shuttles, and respect the land, you’ll get the best out of it.
Best Time of Year to Visit
I’d say aim for May through September. The weather’s more predictable, and you’ll dodge most of the rain.
Permits get snapped up fast in summer. The trail allows 60 hikers per day between May 15 and September 15, but only 30 per day in winter.
I usually try to snag a permit exactly three months out on Recreation.gov.
Fall and spring have fewer crowds, but storms can roll in without warning. I got caught in an October downpour once, and those creek crossings turned sketchy fast.
Winter hiking? It’s doable, but you’ll need solid skills and waterproof gear.
Weather by season:
- Summer (June-August): Warmest, driest, and busiest
- Fall (September-November): Cooler, some storms, moderate crowds
- Winter (December-February): Cold, wet, and quiet
- Spring (March-May): Unpredictable, wildflowers, and crowds start to build
Guided Tours and Group Options
Lost Coast Adventure Tours runs a shuttle between Mattole Beach and Black Sands Beach. It costs about $35-45 per person and honestly saves a ton of hassle.
I always go for the shuttle. Driving between trailheads takes nearly two and a half hours on winding, narrow roads.
The shuttle drops you at the start and brings your car to the finish, which is such a relief after a long hike.
Why I like the shuttle:
- No juggling two cars
- Skip the long, twisty drive
- Set pickup and drop-off times
- Drivers usually know the latest trail conditions
Some hiking groups organize trips, but I prefer going with just one or two friends. Big groups have a rough time with campsites and timing the tides anyway.
Plus, the permit system already caps group size at three, which keeps things manageable.
Leave No Trace and Preservation Considerations
The Lost Coast Trail winds through the King Range National Conservation Area, so you really need to stick to Leave No Trace principles. I’ve stumbled across way too many campsites trashed by careless hikers, and honestly, it’s a little heartbreaking.
Pack out all your trash—yep, even those tiny food wrappers and, yes, toilet paper. The coastal air and dampness don’t break things down quickly at all. I always toss a small bag in my pack just for micro-trash like granola bar wrappers.
Stick to established campsites. When people make new fire rings or clear new tent spots, it tears up the delicate plants and leaves scars that last for years. The camping areas they’ve marked out are there for a reason, and it really does help keep the coast wild.
Protecting water sources is huge. I always filter water from creeks, but I make sure I’m at least 200 feet away from the source. Never wash dishes or brush your teeth right in the streams—no one wants to drink that downstream.
Campfire rules are strict here. You’ll need a California fire permit, but don’t worry, the online course only takes about 10 minutes and gives a decent rundown on safety. Only build fires in the rings that are already there, and drown every ember before you move on.
Wildlife is everywhere, from curious seals to black bears. I keep every scented thing—snacks, toothpaste, you name it—locked up tight in a bear canister. I’ve learned that a clean camp means fewer furry visitors, and I never, ever feed wildlife.